Table of Contents
The Private on the Net project aims to enable private individuals to operate a cloud server on their own hardware. Private on the Net places particular emphasis on ease of use and low costs. The aim is to operate a small server in your home. The server in turn provides data services for your own computers and smartphones.
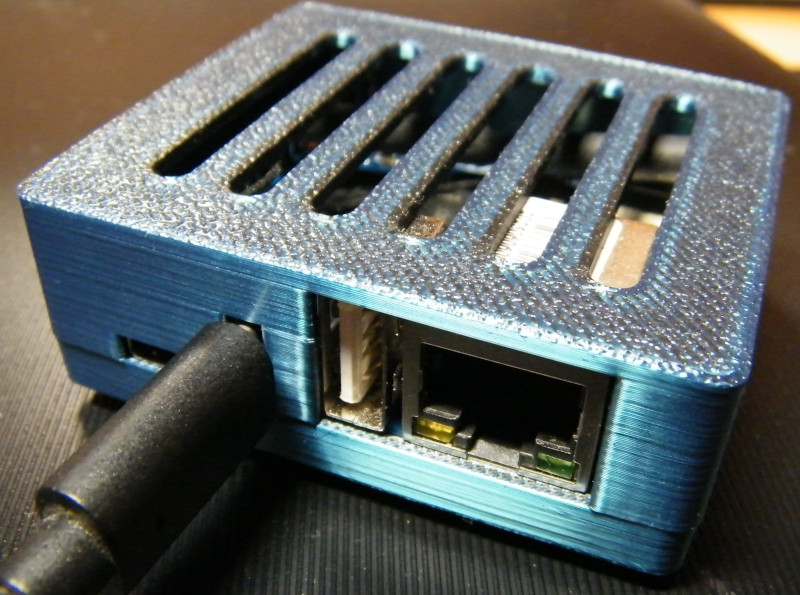 |
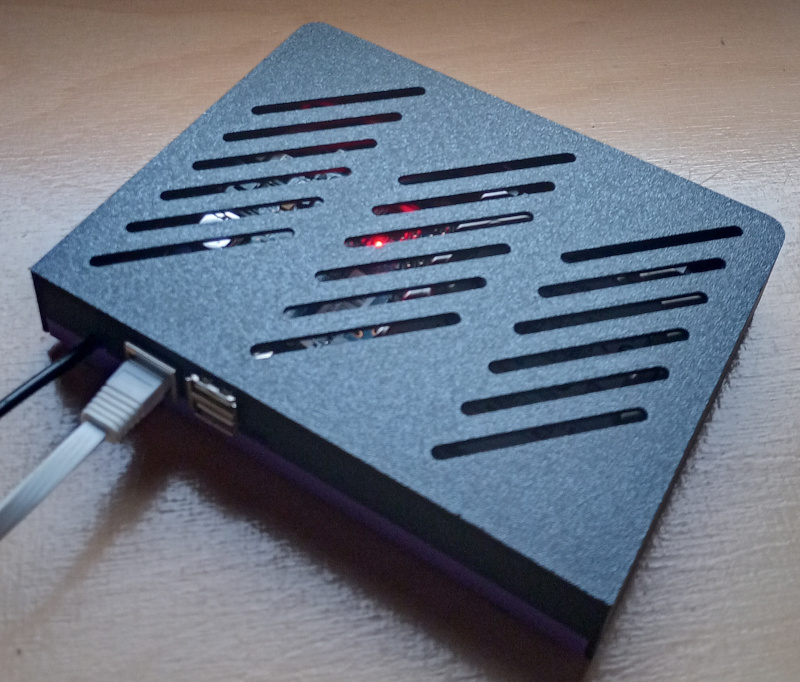
Orange Pi 3 Zero with 3D-printed case
After commissioning, the running server consists of the following components:
-
Silicon: A small, fanless mini-computer measuring just a few cubic centimeters provides the computing power. It should be a dedicated computer, as this type of server runs continuously. Suitable small computers are available as a by-product of smartphone evolution. Single-board computers (SBCs) with ARM CPUs, sufficient RAM, and a memory card for permanent data storage can be purchased for little money. The best-known SBC is the Raspberry Pi, which is now available in several hardware versions. For Private on the Net, Chinese SBCs from Shenzhen Xunlong are currently preferred: Orange Pi Zero 3.
-
Operating system: Armbian is used as the operating system. Armbian is a variant of the Debian Linux operating system specialized for ARM CPUs and SBCs. Armbian can be run on a large number of different SBCs (see https://www.armbian.com/download/). You can download the appropriate image files, transfer them to an SD card, and then start them.
-
Cloud software: Nextcloud is a cloud software system developed in Germany for managing personal data (see https://nextcloud.com/de/). In addition to synchronizing files between different (personal) computers and smartphones, you can store and manage contacts, addresses, and photos in a centralized location. You can offer your own files for download by other users, exchange information with other users via chat, or coordinate projects with a jointly edited document. The Nextcloud software can be operated via a web interface. You can install additional apps via the Nextcloud app store. There are also suitable utilities for common computer and smartphone operating systems.
Larger Nextcloud systems with multiple users also offer video conferencing, office software, office communication, and email integration, for example. It is also possible to network multiple Nextcloud systems with each other (“federation”). Some of these functions can overload small SBCs, but larger systems can be rented from professional providers.
-
Appliance 1: A suitable system for installing and maintaining Nextcloud has been available for some time: NextcloudPi can be used to install the Nextcloud software and optimize it for operation on SBCs (see https://docs.nextcloudpi.com/). NextcloudPi also offers configuration software for system administration using a web interface or, alternatively, a terminal text menu.
-
Appliance 2: Private on the Net provides suitable scripts and configuration pages to simplify installation, optimize operation, and enable a collaborative backup concept. Private on the Net offers both the script for creating bootable image files and the source code for the additional software packages used in an open source repository (see https://codeberg.org/sven-ola/privat-in). There is also a separate Debian repository for these software packages, so that future versions will be distributed with the automatic update.
-
Project server: Not all private Internet connections have externally accessible IPv4 or IPv6 addresses. Internet connections with CGNAT, DS-Lite, or Map-T allow you to use external services. However, for technical reasons, your own services cannot be accessed from outside. In addition, there may be cases where the necessary port forwarding cannot be set up on the Internet connection device. In both cases, your own server can establish a Wireguard tunnel to the Private on the Net project server, through which a connection from outside is indirectly switched back.
The project goal of Private on the Net is to empower private individuals against ubiquitous data administrators, who are now sometimes perceived as intrusive. Doing things yourself, educating yourself, becoming more independent: this imparts knowledge and also puts you in a good mood. With this in mind, Private on the Net wants to encourage people to use their own Internet access, their own DynDNS name, or to start a new backup group.
Note
Another goal of Private on the Net is to generate donations for the local hackspace, specifically FabLab Lüneburg (see https://www.fablab-lueneburg.org/). To this end, I plan to sell the SBCs described above at cost price and, in exchange for a donation to the association, provide instruction on commissioning and maintenance during evening events.
Important
The Private on the Net project is designed exclusively for small Nextclouds on equally small server computers. For larger installations on full-grown servers with plenty of memory and computing power, there is Nextcloud All-in-One. It may be better for your purposes to follow the excellent instructions at https://github.com/nextcloud/all-in-one#how-to-use-this.
The commissioning of your own Private on the Net server has been deliberately designed to be simple. In principle, it can be done without a deep understanding of the system properties. For this reason, a very technical description can be found in the appendix at Storage Concept.
However, you should be aware that your data is stored in encrypted form on the SD card. This means that the installation process takes longer to ensure that your data is stored with individual encryption. The installation takes around 15 minutes, after which the encryption password is displayed.
A second password is stored in a separate memory chip on the SBC for device startup, so that a lost SD card cannot simply be decrypted. However, with direct and physical access to the SBC and SD card, a skilled user can still copy or modify your data.
The encryption password is also around 100 characters long and consists of randomly generated characters. It is best to use a password manager program or a suitable smartphone app to store it.
Caution
If your server uploads a backup snapshot during the night, the device startup password will be removed from the backup snapshot. This means that you can only restore a backup using your encryption password.
Various SBCs can be used as servers. Private on the Net currently offers images for these SBCs:
-
Shenzhen Xunlong - Orange Pi Zero 2 (512 Mb and 1 Gb), Orange Pi Zero 3 (1 Gb or more): Allwinner 64-bit CPU, separate NOR memory, Wi-Fi.
-
Sinovoip - Banana Pi M1 (1 Gb), Banana Pi M2 Zero (512 Mb), Banana Pi M2 Ultra Berry (2 Gb): Allwinner 32-Bit CPU
-
Raspberry Pi, newer models with 64-bit CPU with Armbian. Older models with 32-bit CPU with an adapted Raspbian and an older version of Debian (Bookworm).
I have also tried other SBCs, such as Orange Pi Zero, Raspberry Pi Zero, Odroid U2, and Cubie A5E. Some of these devices do not have enough power, have too little memory, tend to crash due to overheating, or are simply no longer available (or difficult to obtain).
If you want to use an existing SBC, you should download an Armbian or Raspbian image as a basis and extend this image using the conversion script from https://codeberg.org/sven-ola/privat-in.
Note
The Armbian operating system is a so-called rolling release. This means that at least the Linux kernel receives a weekly update. Not all updates were compatible with Private on the Net in the past, so I decided to create the Armbian images for the above-mentioned supported SBCs myself so that an automatic update can be set up during installation.
If you want to buy a new SBC, the ones mentioned above are quite good and inexpensive and available on Amazon, eBay, or Aliexpress. Of course, you can also check out Reichelt, Conrad, Pollin, or Völkner. Brick-and-mortar retailers in Germany do not usually sell such devices.
SBCs are usually sold with various accessories: power supply, USB cable, case, heat sink, and SD card are included in any combination at an additional cost. To make your own case using 3D printing, you can download a suitable STL file from Thingyverse or Printables.
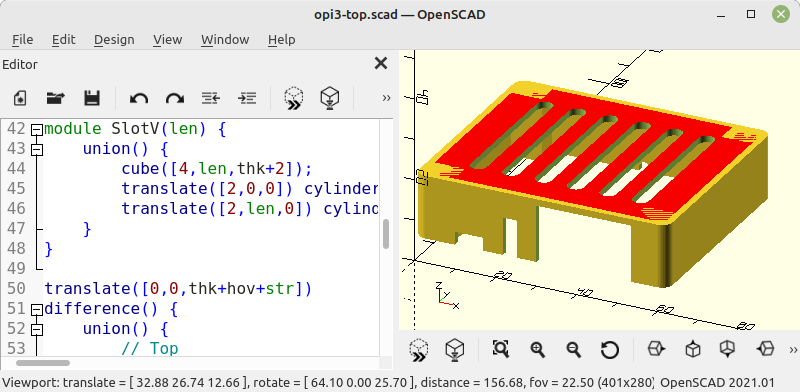 |
Orange Pi 3 Zero case in OpenSCAD
For some selected SBCs, you can find source files in the project repository under /housing. The *.scad files can be converted to *.stl format using OpenSCAD, allowing you to import them into 3D printing software.
![]() Your computer or smartphone already has everything
you need: a Wi-Fi module, an optional Ethernet connection, and a web
browser are always available. If you don't use password management yet,
I strongly recommend installing and trying out
password management software or a password app. For beginners, KeePassXC
Password-Manager Password Manager is a good choice.
Your computer or smartphone already has everything
you need: a Wi-Fi module, an optional Ethernet connection, and a web
browser are always available. If you don't use password management yet,
I strongly recommend installing and trying out
password management software or a password app. For beginners, KeePassXC
Password-Manager Password Manager is a good choice.
Note
Of course, you can also write down passwords on a piece of paper. This automatically leads to the reuse of passwords that are far too simple and can be guessed using a dictionary attack.
Of course, you can also save passwords in your web browser settings. By logging into one of the major cloud providers with your web browser, these passwords can also be synced across multiple devices. At this point, at the latest, you will start receiving personalized advertising. But first, there is a reason why important services such as banks, developer websites, or government agencies often require two-factor authentication today: without 2FA, it may be more convenient, but it is also prone to user errors or worse. And second, I would never entrust the security of my passwords to an unknown cloud provider. Furthermore, Private on the Net is also about digital independence, and a password manager is simply part of that.
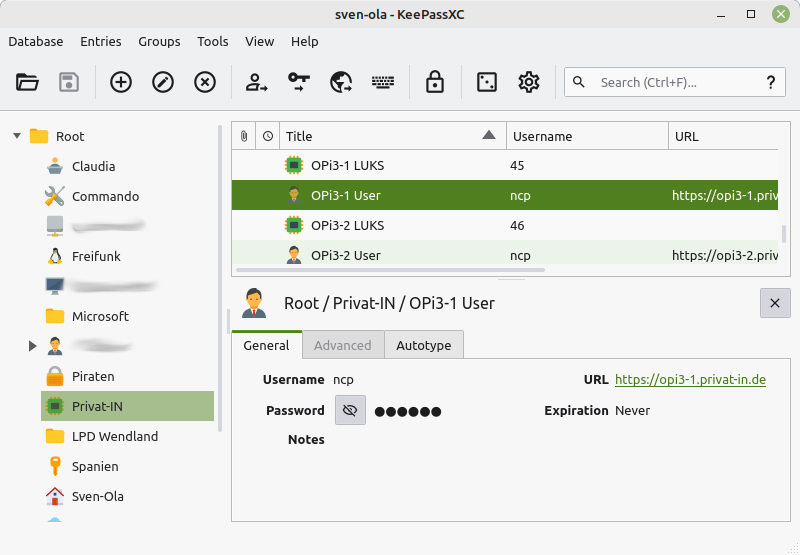 |
This is what it could look like for you after a while
An “image” is a file containing a disk image. The Private on the Net images contain a U-Boot bootloader, a Linux kernel, a Linux startup environment (“Initramfs”), and a selection of pre-installed software (“userspace program packages”). An image file is between 2 and 3 GB in size, so downloading and transferring it to an SD card takes a few minutes. You can find my images on the Private on the Net project server at https://privat-in.de/downloads/.
You will need a notebook or desktop computer with a micro SD card adapter. Micro SD cards can also be written to using a simple mechanical adapter with a “large” SD card adapter. You can also use a micro SD card adapter on the USB port.
Important
You cannot write directly to an SD card with a smartphone. You will need a desktop computer or laptop to do this.
Tip
For advanced users only – enter your SSH public keys: Display
the offset of the first image partition: fdisk -l
sd.img, usually 8192 sectors. Then mount the partition, for
example with sudo mount -o loop,offset=$(( 512 * 8192 ))
sd.img /mnt. Edit the file
/mnt/root/.ssh/authorized_keys and unmount the
partition.
Many Linux users are familiar with this: a bootable SD card can be written using a command line command. It would be a fatal mistake to overwrite the wrong device here. Therefore, check the target device specification (of=) very carefully.
sudo dd if=sd.img of=/dev/mmc<number> bs=1M status=progress && sync
Other operating systems prevent direct access to storage media and therefore require additional software. There are all kinds of utility programs available for Windows, such as Rufus. It should also work with the built-in tools in macOS, but there are utility programs available for this too. There are good descriptions of this topic on the Internet; just search for “Raspberry Pi image write Windows macOS Linux”.
The following steps will lead to a running SBC:
-
Download the image that matches the SBC.
-
Copy the image to a micro SD card (see above).
-
Insert the micro SD card into the SBC.
-
Connect the SBC to the Internet access device using an Ethernet cable.
-
Connect the SBC to a USB power supply using a USB connection cable.
-
Plug the USB power adapter into a power outlet.
The first start may take a few minutes. During this time, the Linux startup environment will set up the larger part of the SD card with an encrypted file system. During this process, the green LED on the SBC should flash (“Disk Activity”). Another LED on the Ethernet port (“Net Activity”) should light up green or blink.
Important
If neither of the two green LEDs lights up, the SBC will not start. If a red LED lights up, this indicates an error during initialization.
For troubleshooting and analysis, I can only provide some tips here. Are the connection cables plugged in correctly? Is the SD card inserted correctly? Was the SD card written with the correct image? Connecting an HDMI monitor and a USB keyboard may help. Alternatively, the startup process can be analyzed using a serial UART connection. In this state, the password “admin” is set for the “root” user.
After the initial start-up and with an Internet access device connected via Ethernet, the SBC's WiFi radio module switches to access point mode. The SBC then transmits a radio identifier with the IPv4 address of the Ethernet connection: “privat-in.de (192.168.x.x)”. You can now open the web interface for installation.
Start with a smartphone
-
Open the Wi-Fi settings on your smartphone. After a short time, the smartphone will display several wireless identifiers.
-
Tap on the entry “privat-in.de” and activate the connection. This connection works without a password.
-
A login window opens automatically in a web browser, known as a “captive portal”.
Start with a computer or notebook
-
Start a web browser on your computer.
-
Open your computer's Wi-Fi settings. The Ethernet IP address of the SBC will be displayed here in the “privat-in.de” wireless identifier.
-
Enter the character string
http://in the address bar of your web browser. Add the IP address you read from the wireless identifier (“192.168.x.x”).
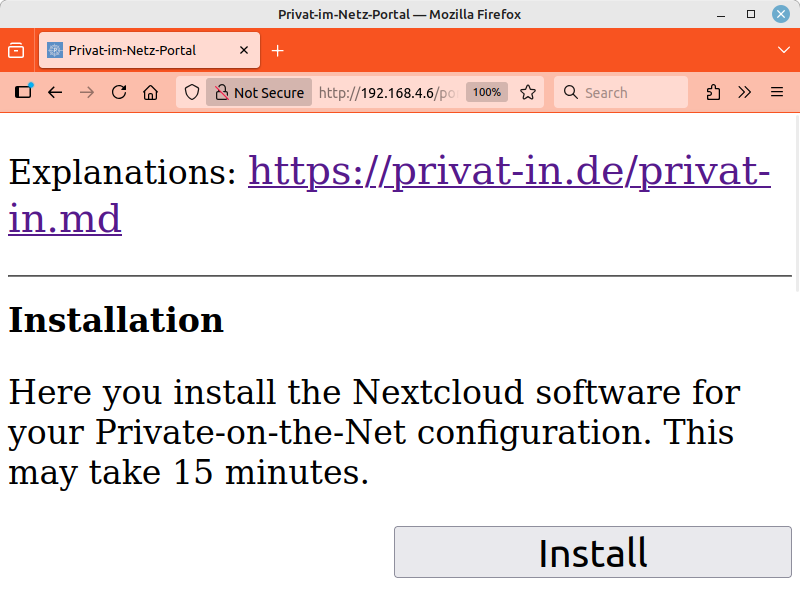
Installing with the web interface
The web interface displays three buttons: , , and .
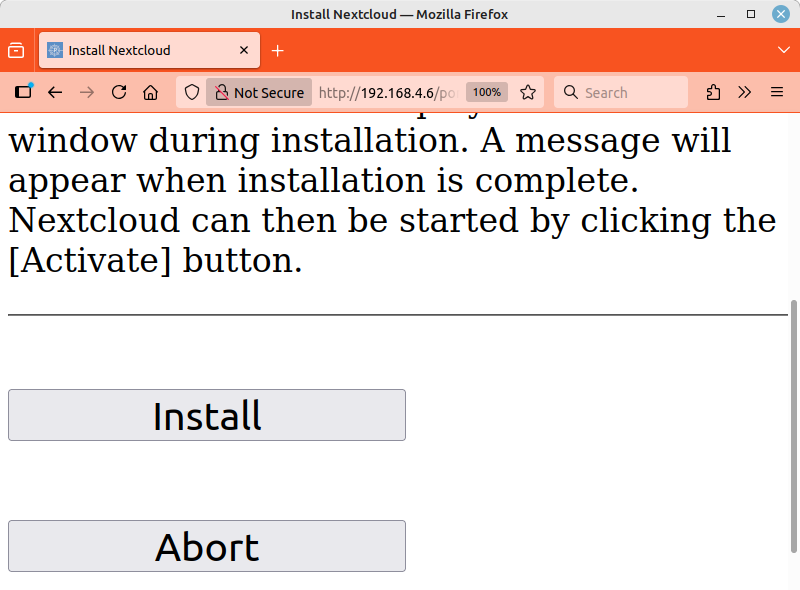
Clicking the button will take you to another page explaining the process that follows. Here, you start the installation script by clicking the button again. The output of the script is now displayed continuously on a web page. The script installs updates, downloads the Nextcloud software, installs it, and adjusts the system configuration for Nextcloud. This process takes about 15 minutes.
Important
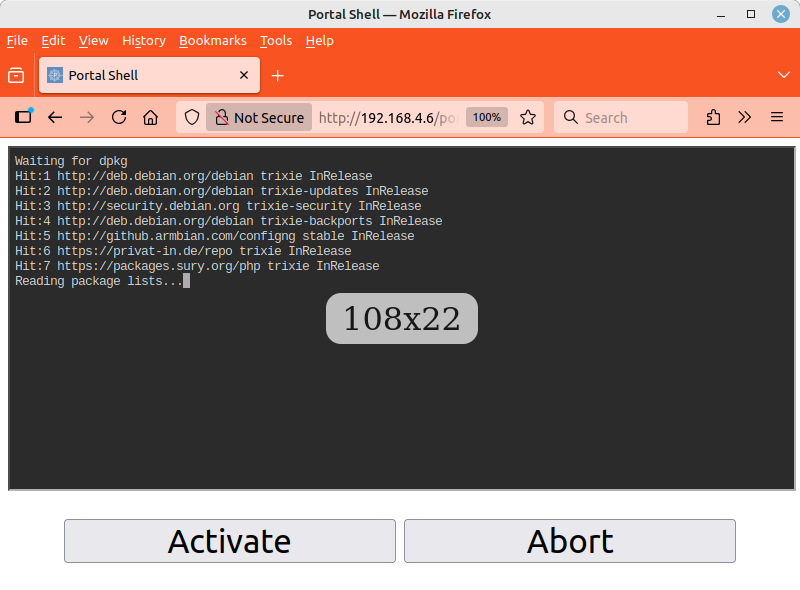
The installation should not be interrupted if possible. If you close the web browser window, the smartphone goes into sleep mode, or the terminal applet loses connection, the process will continue to run in the background. Simply open the website again or reconnect the smartphone.
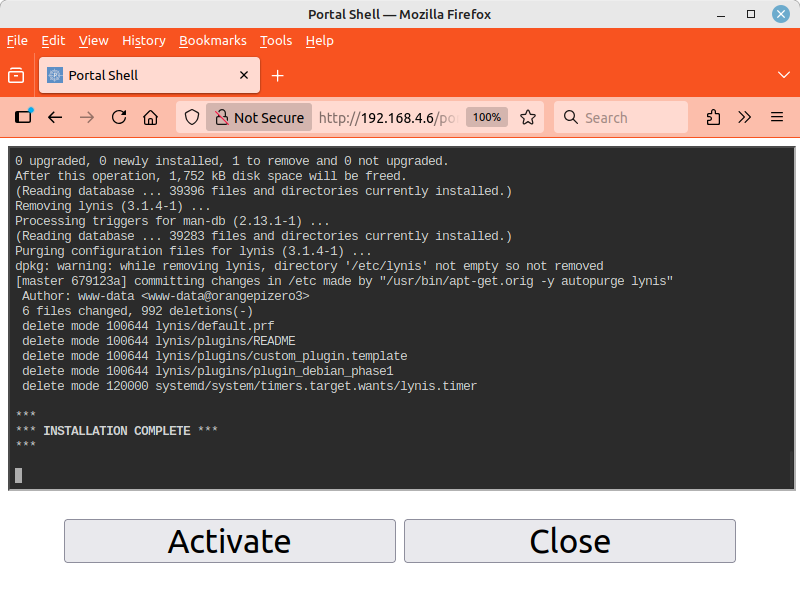
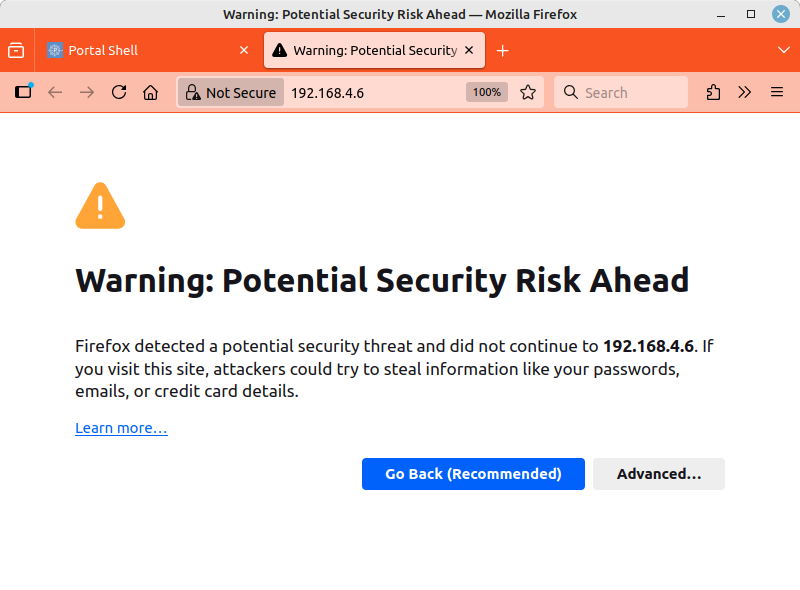
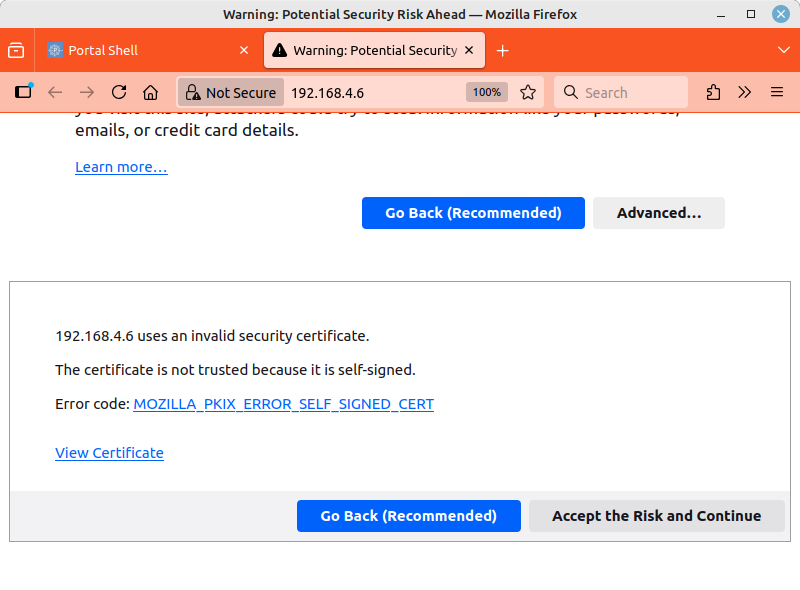
Wait until the message *** INSTALLATION COMPLETE *** appears. At this point, the button will open a new page with the encrypted HTTPS protocol. Since no “official” website certificates are issued for local IPv4 addresses, your web browser will now warn you of a possible security risk. On the Internet and on public websites, you should take this warning seriously and leave the website. Here, however, you must accept the risk. The usual buttons for this are and (or similar).
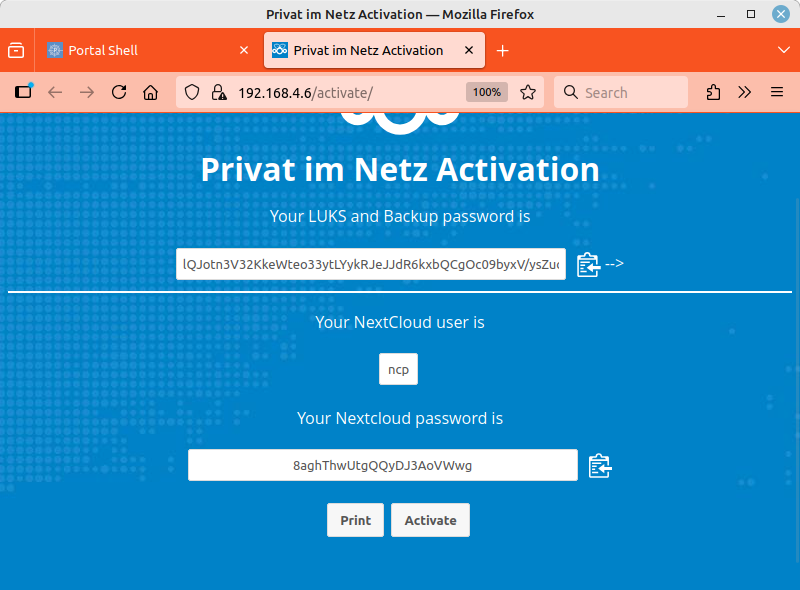
The activation page now displayed with a blue background already belongs to the NextCloudPi you just installed. Two randomly generated passwords are shown here. You must copy both passwords into your password manager:
-
The upper, longer encryption password protects the data encryption of the SD card and all your backup images.
-
The lower, shorter password protects the NextcloudPi web interface on port 4443 and the normal administration account for your Nextcloud. The account name is “ncp”.
Caution
In principle, this is the moment when another person could perform the same copying process. This is a trade-off between “simplicity” and “security”: you should generally not perform the installation in busy places. If you need to be extra secure, remove the WiFi antenna from the SBC board, place the device in a microwave oven, for example, and complete the installation via the Ethernet connection.
To copy the passwords, click on the ![]() icons displayed next to them. Activate the
passwords using the button at the bottom
of the page. Your web browser will then switch to the
NextcloudPi panel on port 4443. With the
changed port number, you must again accept the security risk of a local
website connection. In the following password dialog, you must enter the
account name “ncp” and copy the shorter password from your
password management system.
icons displayed next to them. Activate the
passwords using the button at the bottom
of the page. Your web browser will then switch to the
NextcloudPi panel on port 4443. With the
changed port number, you must again accept the security risk of a local
website connection. In the following password dialog, you must enter the
account name “ncp” and copy the shorter password from your
password management system.
Note
When you first open the NextcloudPi panel, a NextcloudPi First Run wizard will appear. Here, you can connect an external storage device and set up Internet access for the SBC. I recommend clicking the button here.
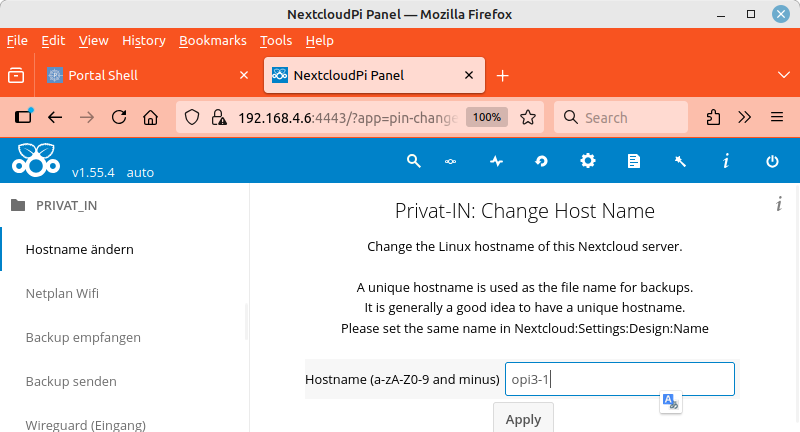
One of the first settings you should configure is the host or computer name for the SBC, as this name is used in many different places. You can find this setting in the menu on the left under .
Table 1. Smartphone: Installation with Captive Portal
Establish a new Wi-Fi connection |
Start with | ||
Read the explanation |
The installation is running | ||
Wait for *** INSTALLATION COMPLETE ***, then tap . | |||
Ignore a security warning |
Another security alert | ||
Copy passwords, then tap |
Log in to the NextcloudPi panel | ||
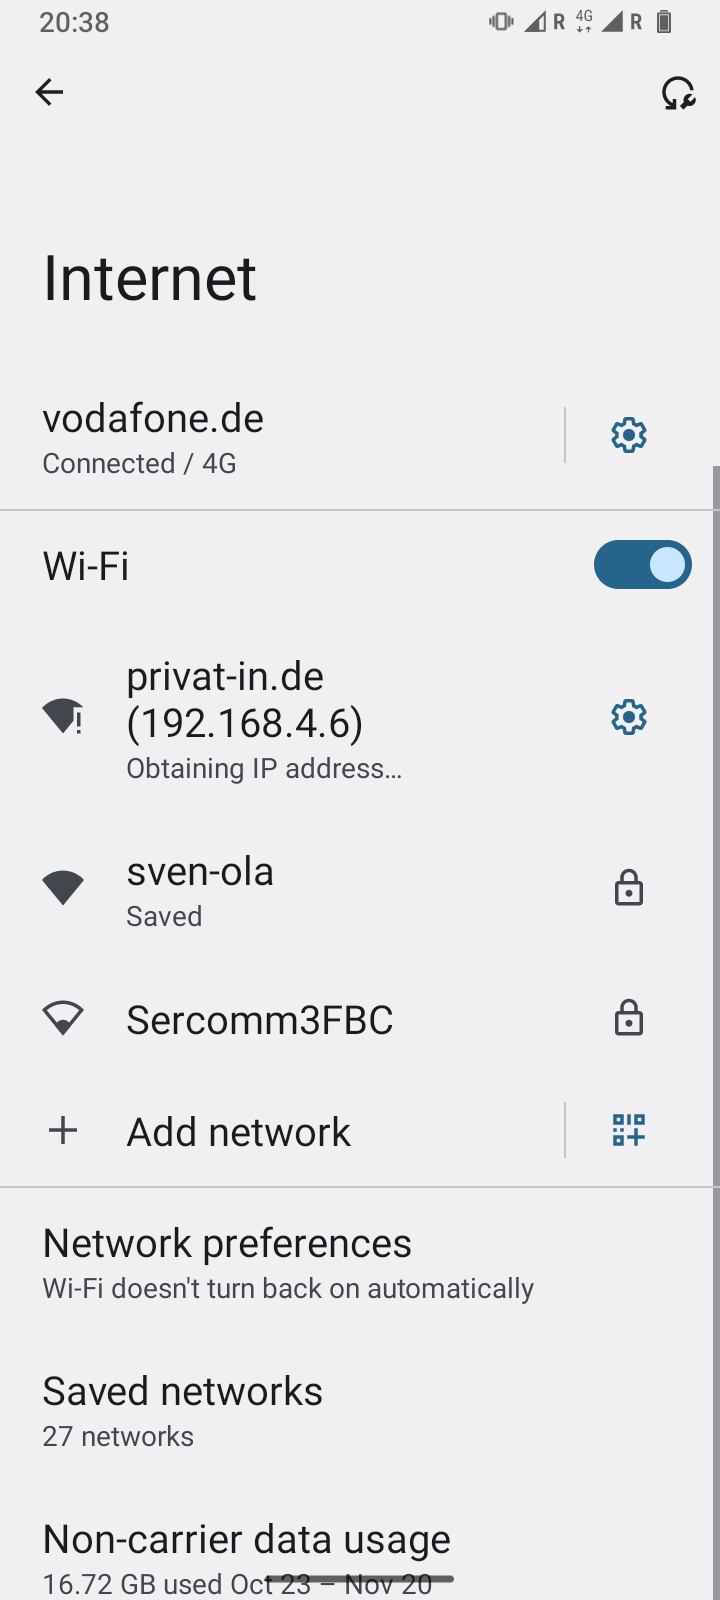
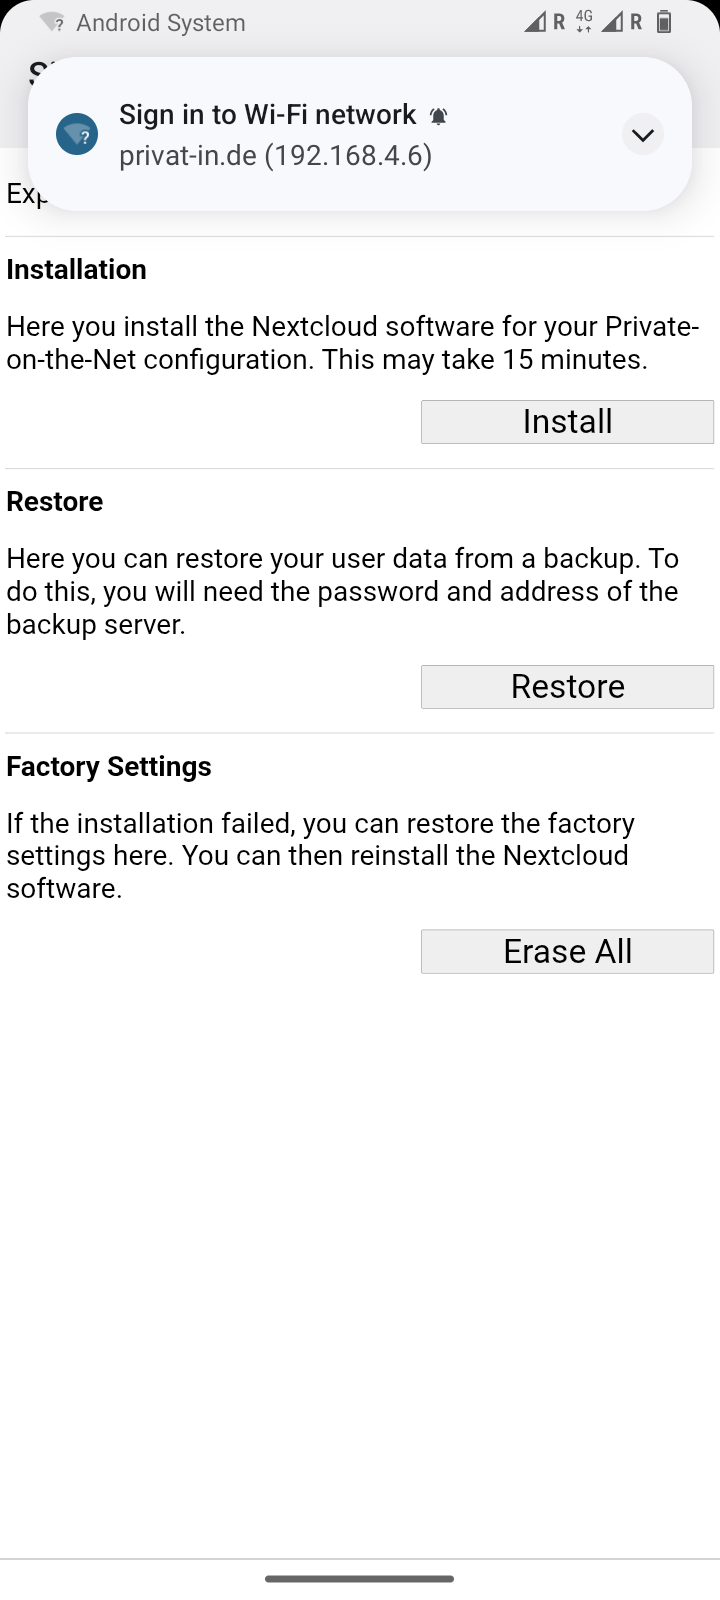
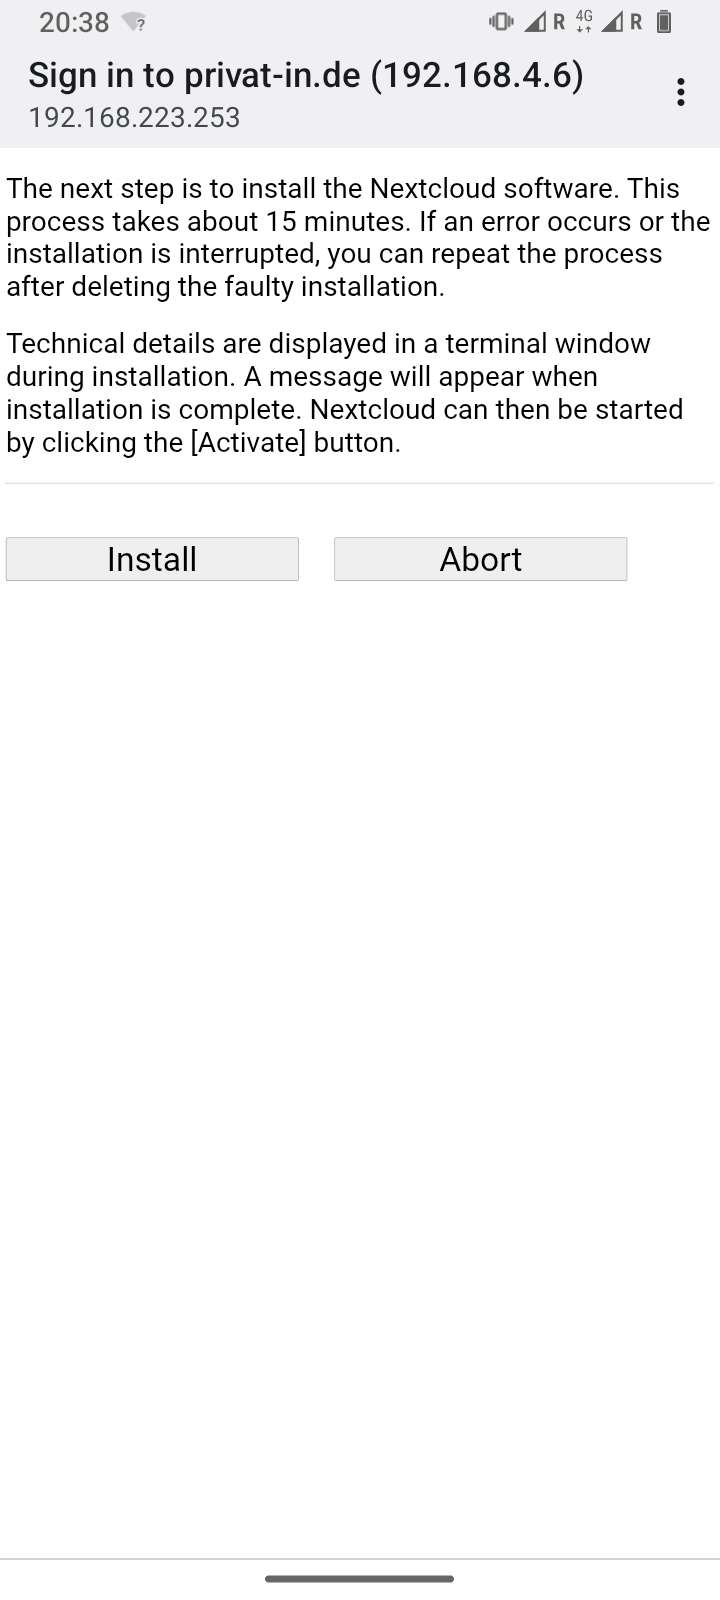
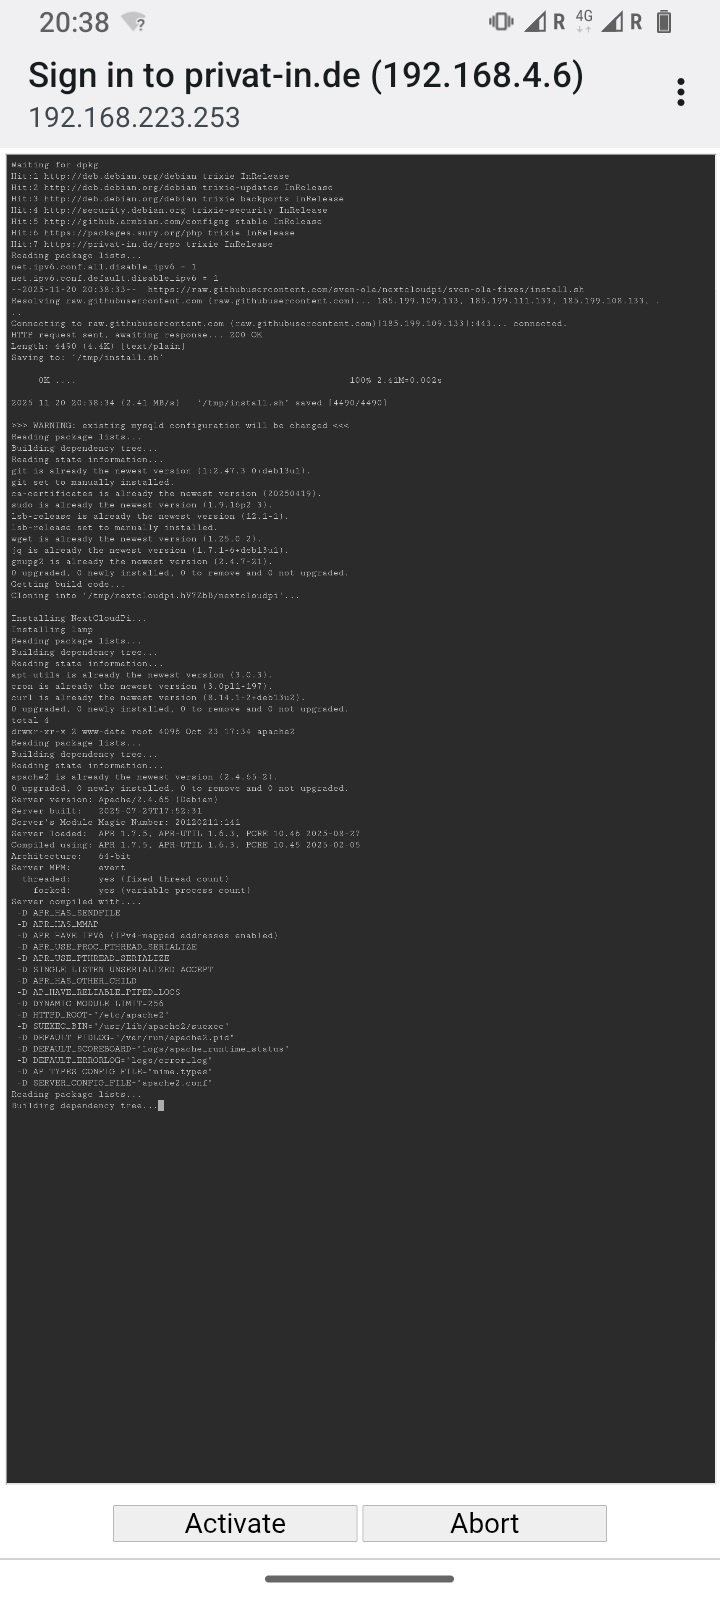
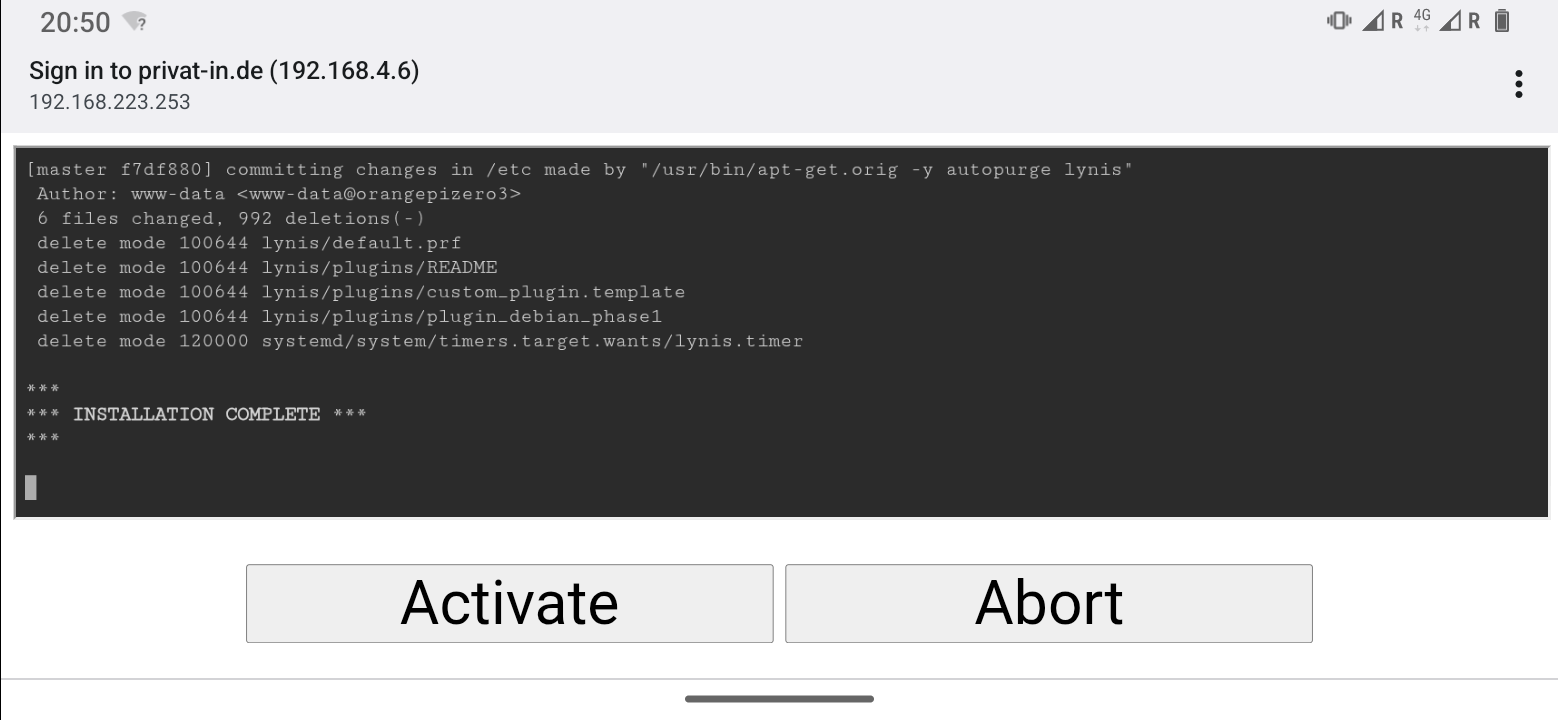
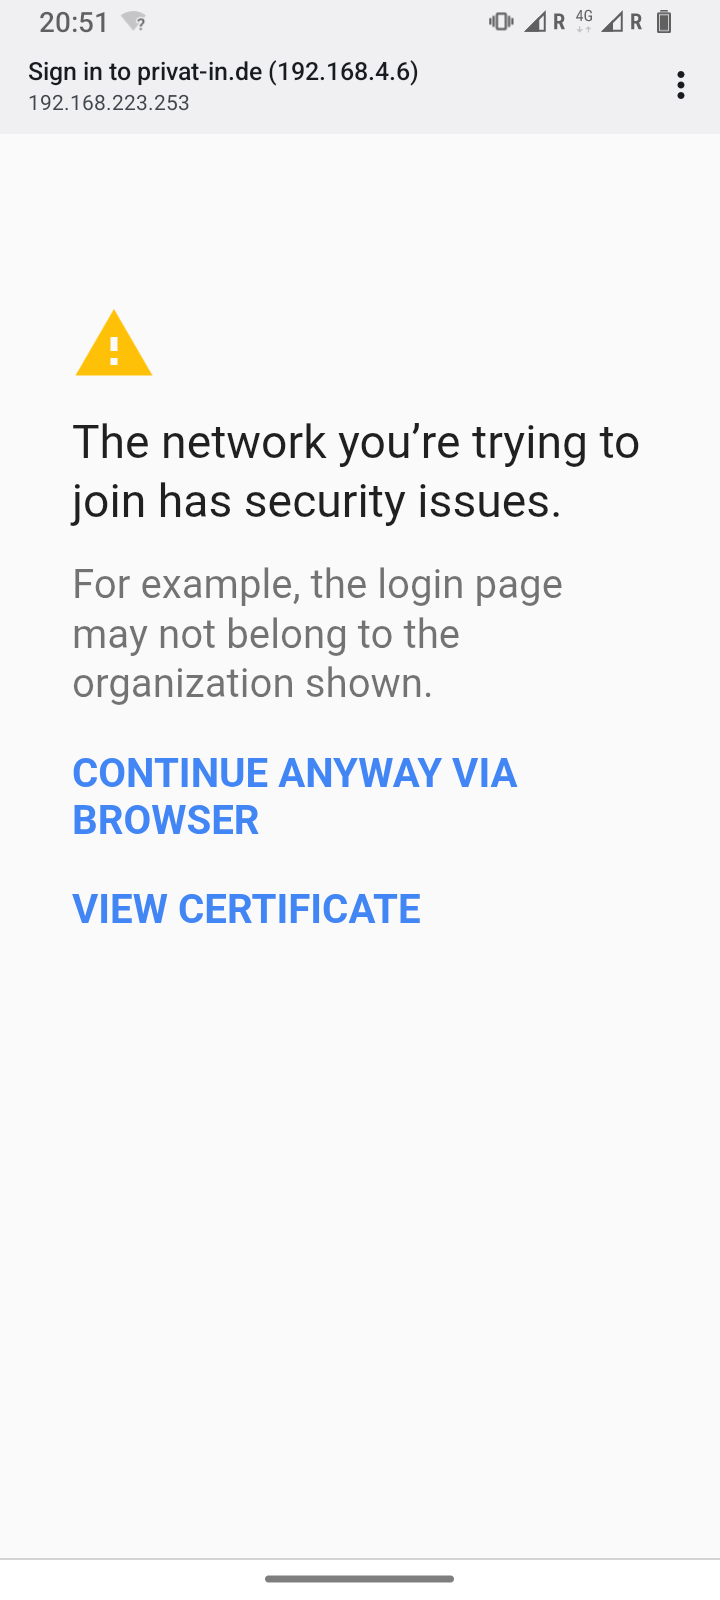
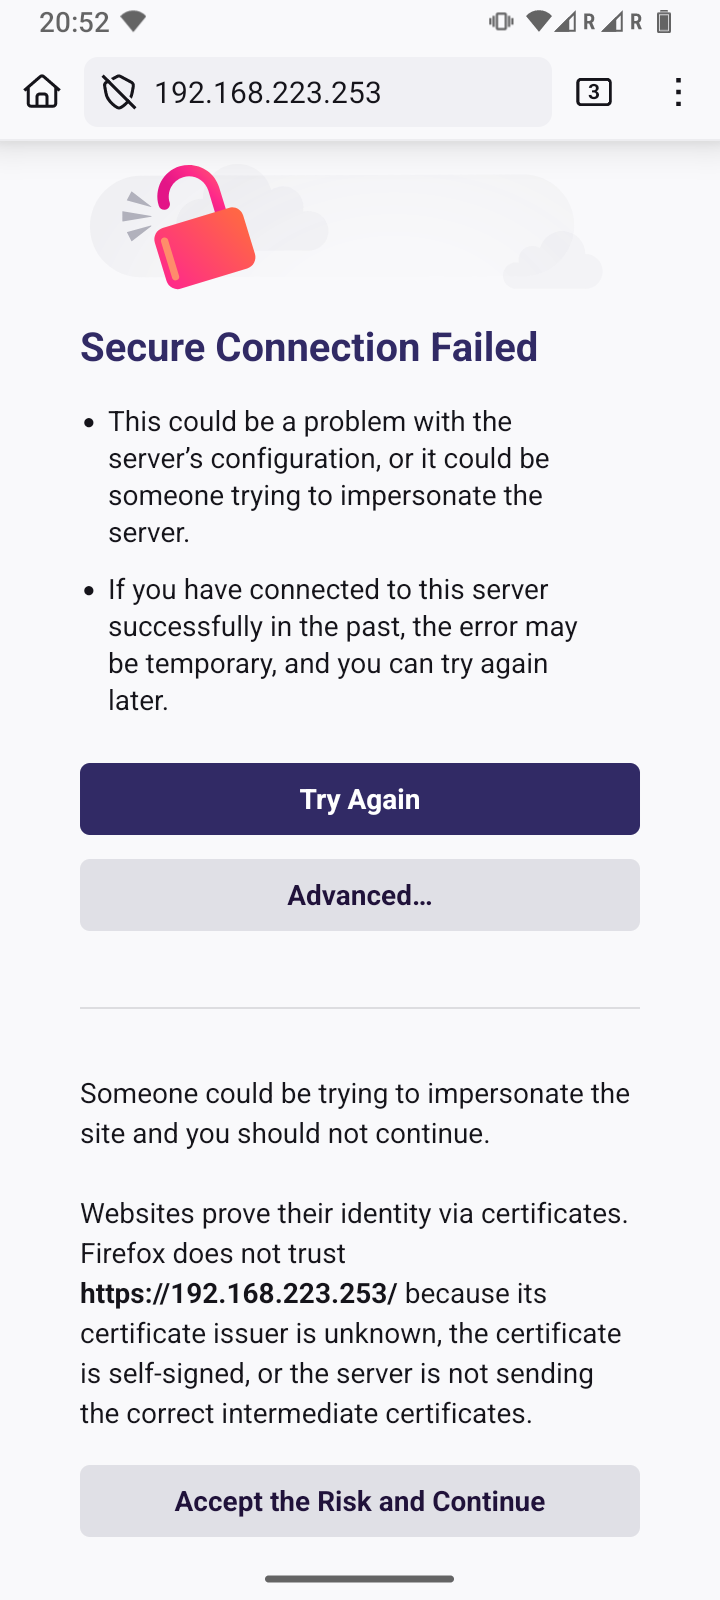
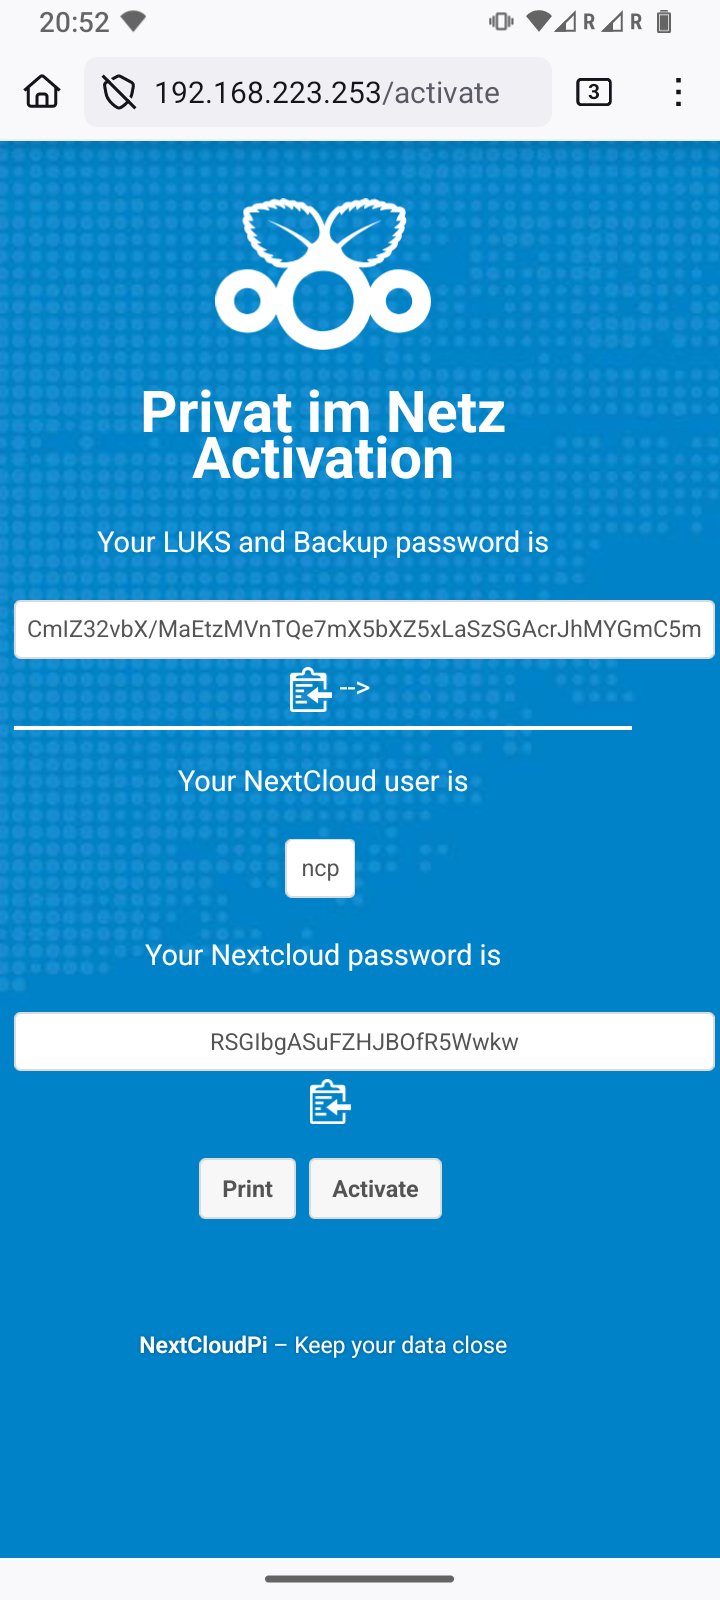
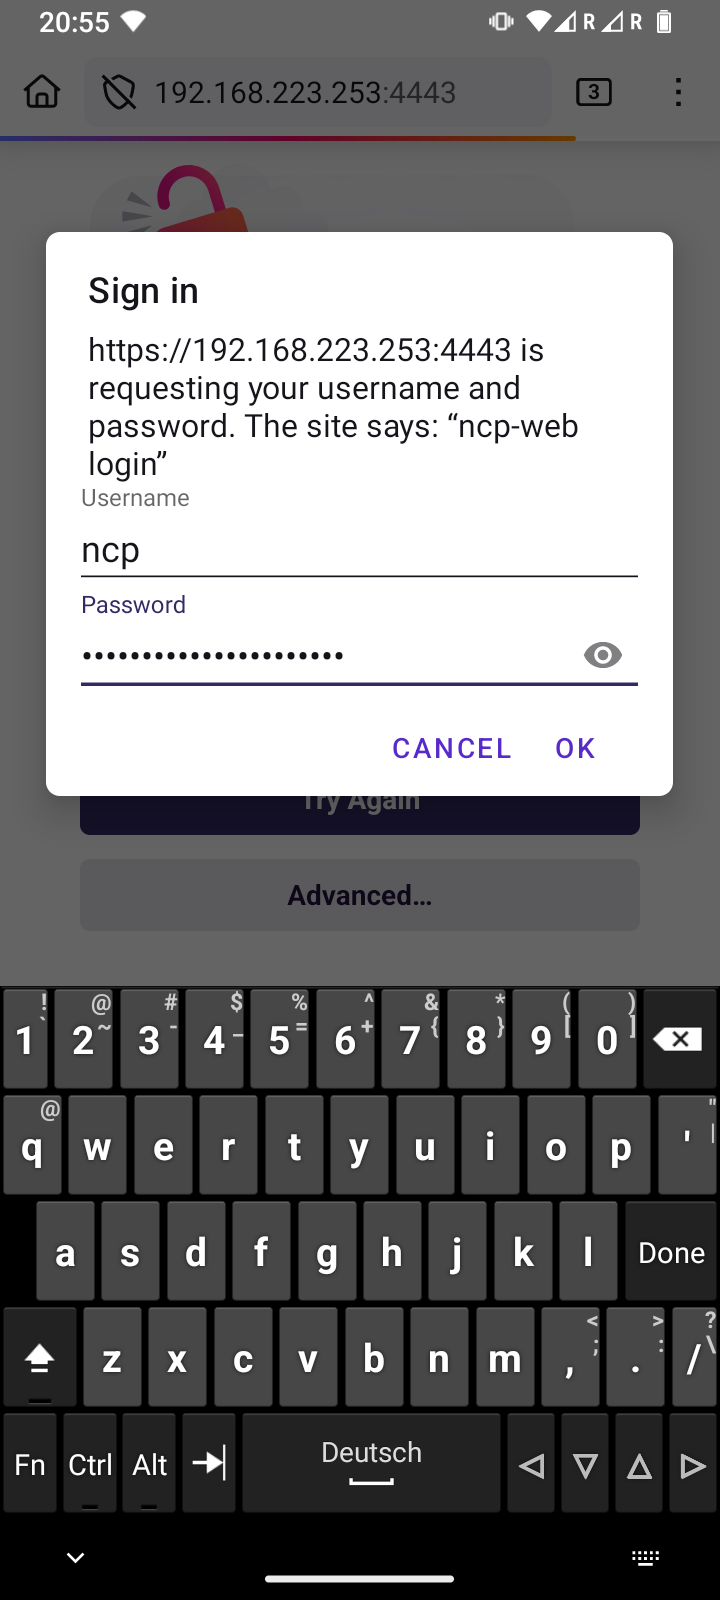
Table 2. Desktop: Installation in the browser
The unencrypted portal page | |
The explanatory page on installation | |
The installation is running | |
*** INSTALLATION COMPLETE *** Wait, then click . | |
The web browser warns on local IP addresses | |
The warning must be accepted in two stages | |
The activation dialog displays the passwords (changed by the editors) | |
NextcloudPi panel: Skip the first-time access wizard | |
NextcloudPi panel: Setting the host or computer name |

The web browser security warnings make your Nextcloud virtually unusable. That's why you need a website certificate. You can connect any DNS name to a free website certificate. There are two requirements for this: You can run the Letsencrypt software on your server, and port 443 of your server is actually accessible from the Internet with the specified DNS name.
First, you need a DNS name. DNS stands for “Domain Name System”, a globally available system for looking up numerical IP addresses. In addition, your Internet access device is usually assigned a changing public IP address. The address change can occur regularly or when you reconnect.
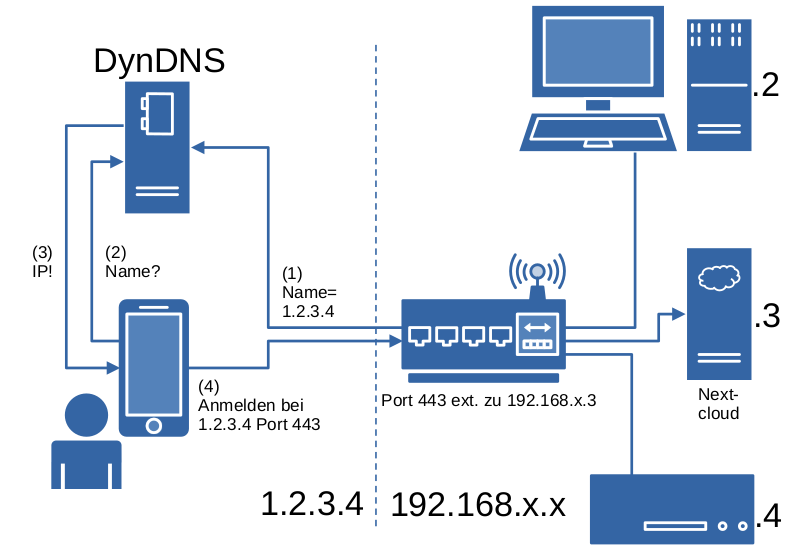 |
To connect a DNS name to a changing IP address, you can set up a DynDNS service. It is possible to use a DynDNS service that is supported by your Internet access device. Alternatively, or in addition, you can configure a DynDNS service on your server by following these steps.
-
Visit the website of one of the supported DynDNS services. In the NextcloudPi panel, you will find several entries for DynDNS services in the menu: , , , , and .
-
For all DynDNS services, you must first create an account. To do this, you usually enter your email address, sometimes an account name, and a password. This is a good opportunity to practice using the password manager. Some services cost money, others are free and send advertising by email, and still others are donation-based.
-
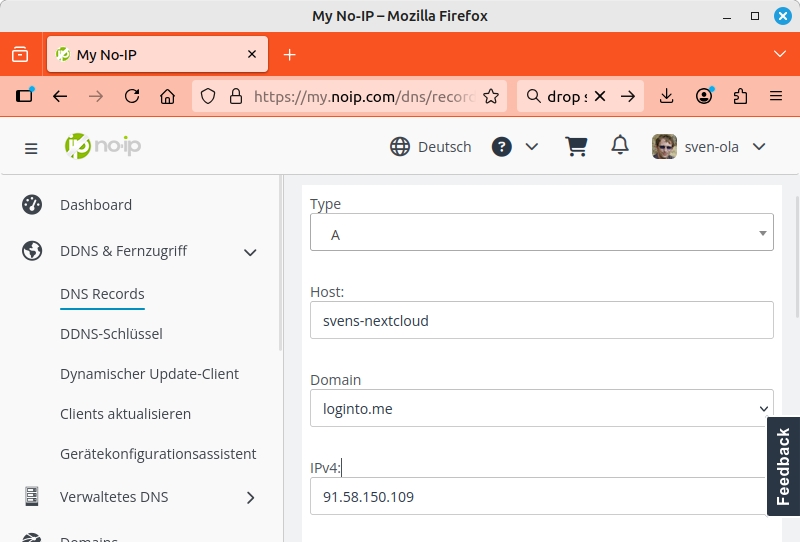
For example, I have had a DynDNS name at https://www.noip.com/ for many years. With this DynDNS service, I have to click on the link in an email once a month. In the screenshot below, I am creating a new DynDNS name, “svens-nextcloud.loginto.me”, in the menu.
-
Next, I open the NextcloudPi panel and select the entry from the menu. There, I activate the Active option, enter my No-IP login details under User and Password, and enter the Domain “svens-nextcloud.loginto.me”. I confirm the configuration by clicking the button.
-
The DynDNS service you have set up should be checked. To do this, you can, for example, disconnect and reconnect the power supply to your Internet access device. Then search for “My IP” using Duckduckgo or use a similar service to determine your new public IP address. To check, enter the command line command ping <your.dns.domain> and compare the IP address displayed with the result in the web browser. Your Internet access device should display this IP address in a status dialog.
Next, you need to set up port forwarding for port 443 to your server's internal IP address. You can only do this on your Internet access device. Unfortunately, there are different Internet access devices and the operation is not uniform. Here, it helps to take a look at the user documentation, a web or YouTube search, for example, “port forwarding” combined with the product name of your Internet access device.
Important
Please disregard instructions for setting up UPnP, PCP, or other automatic port forwarding mechanisms. Your server only supports manually configured port forwarding.
Tip
Test the combination of DynDNS name and port forwarding with a smartphone. To do this, turn off the Wi-Fi connection so that the device can only communicate via the mobile network connection. Then open the configured website, which in the above example would be “https://svens-nextcloud.loginto.me”. If a warning about a possible security risk is displayed, then both configuration settings are most likely working.
If your Internet connection does not use CGNAT, DS-Lite, or Map-T, and you have set up DynDNS and port forwarding, you can ignore this topic. Otherwise, it is possible to access your server indirectly from outside using the Private on the Net project server. For this, your server establishes a permanent connection to the Private on the Net project server. Outgoing connections are possible because the devices involved in the outgoing connection allow the outgoing data packets and can assign response packets. The Private on the Net project server can then exchange data packets “piggyback”, so to speak, from participants on the Internet via the existing connection (“tunneling”).
Note
Technically, this works wonderful. Structurally, however, it creates a SPOF (“single point of failure”), as the Private on the Net project server could go out of service or be attacked. I would also be happy to help you set up your own project server. Topics would include: selecting a provider, setting up subdomains, and encrypting a paravirtualized VPS.
Setting up a tunnel requires only a few steps:
-
You come up with a subdomain for “privat-in.de” that has not yet been used. You send it to me with a request for a tunnel.
-
I will set up the subdomain. Specifically, this involves adding an additional CNAME record in the domain management section at Strato. I will also generate a Wireguard key pair and send you the private key and an IP address.
-
In the NextcloudPi panel, open the entry from the menu. Activate the Active option. Enter the settings you received: Private Key and IPv4 Address. The other settings are already preset. Confirm with .
You should then be able to access your server under the new subdomain of privat-in.de.
Note
If your server does not have Wi-Fi or you are setting up in a virtual machine without Wi-Fi, the tunnel setup will take longer. An error will then be displayed. The tunnel should still work.
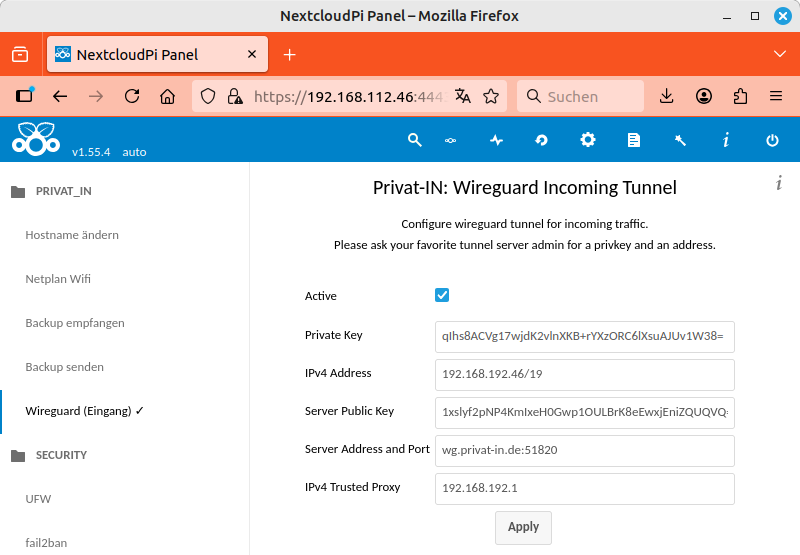 |
Setting up a Wireguard tunnel (key changed by the editors)
If you want to set up a tunnel for another Wireguard server, you must also configure the Server Public Key and Server Address and Port settings accordingly. The IPv4 Trusted Proxy setting is relevant for project servers that redirect external traffic with a reverse proxy. The internal source address of the reverse proxy server must be entered here (see Nextcloud-101: Reverse Proxy).
Note
All CNAME subdomain entries for “privat-in.de” point to the same IP address of the Private on the Net project server. The HAProxy software runs there, forwarding all requests to the individual tunnels. Incoming HTTPS connections are encrypted, but at the beginning of each connection, modern web browsers transmit the desired target server name as plain text (Server Name Identification, SNI).
A digital web server certificate confirms the connection between the domain name displayed in the web browser address bar and the web server delivering the plaintext. This ensures that passwords, orders, and other user input reach the correct server and are not intercepted or falsified by third parties.
The Let’s Encrypt project makes it easy for private individuals to obtain a valid server certificate. This works without proof of identity, without a proficiency test, and without expensive memberships, simply by running the Letsencrypt software on your server. For this, your server must be accessible on port 443 under the specified domain name at the time the certificate is issued. The certificate is then valid for several weeks. There is therefore a background process that regularly renews the certificate that has been set up.
You can set up your Letsencrypt certificate by following these steps:
-
In the NextcloudPi panel, select the entry from the menu.
-
Activate the Active option. Enter the desired settings: Domain and Email. Confirm with .
The small status window on the NextcloudPi panel page now shows the progress. If successful, the newly certified web server key will be applied immediately. Your web browser will also respond to this and display a certificate error again. You must accept the risk again here. Then open your now certified domain in a new web browser window.
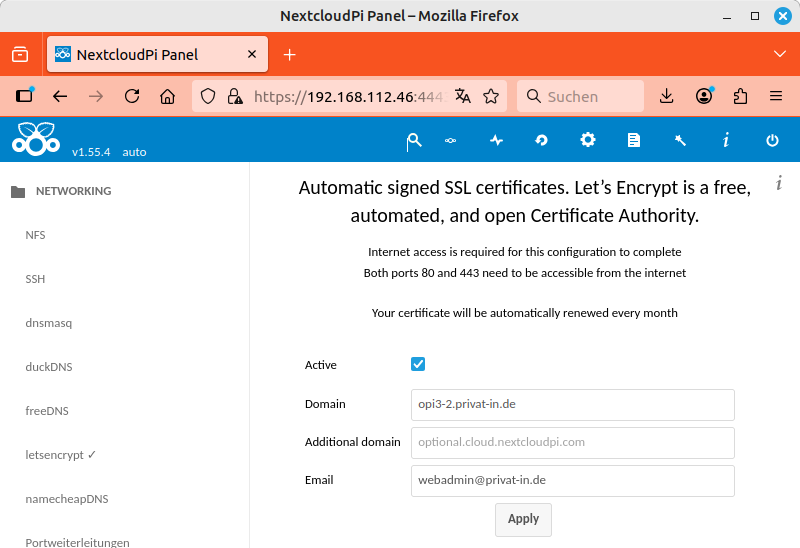 |
NextcloudPi Panel: Obtaining a Let's Encrypt certificate
Important
For a subdomain of “privat-in.de”, you must enter “webadmin@privat-in.de” as your email address. If you have your own DynDNS domain, you must enter your own email address. Although the email address is verified when the certificate is issued, reminder emails about expiring certificates are no longer sent.
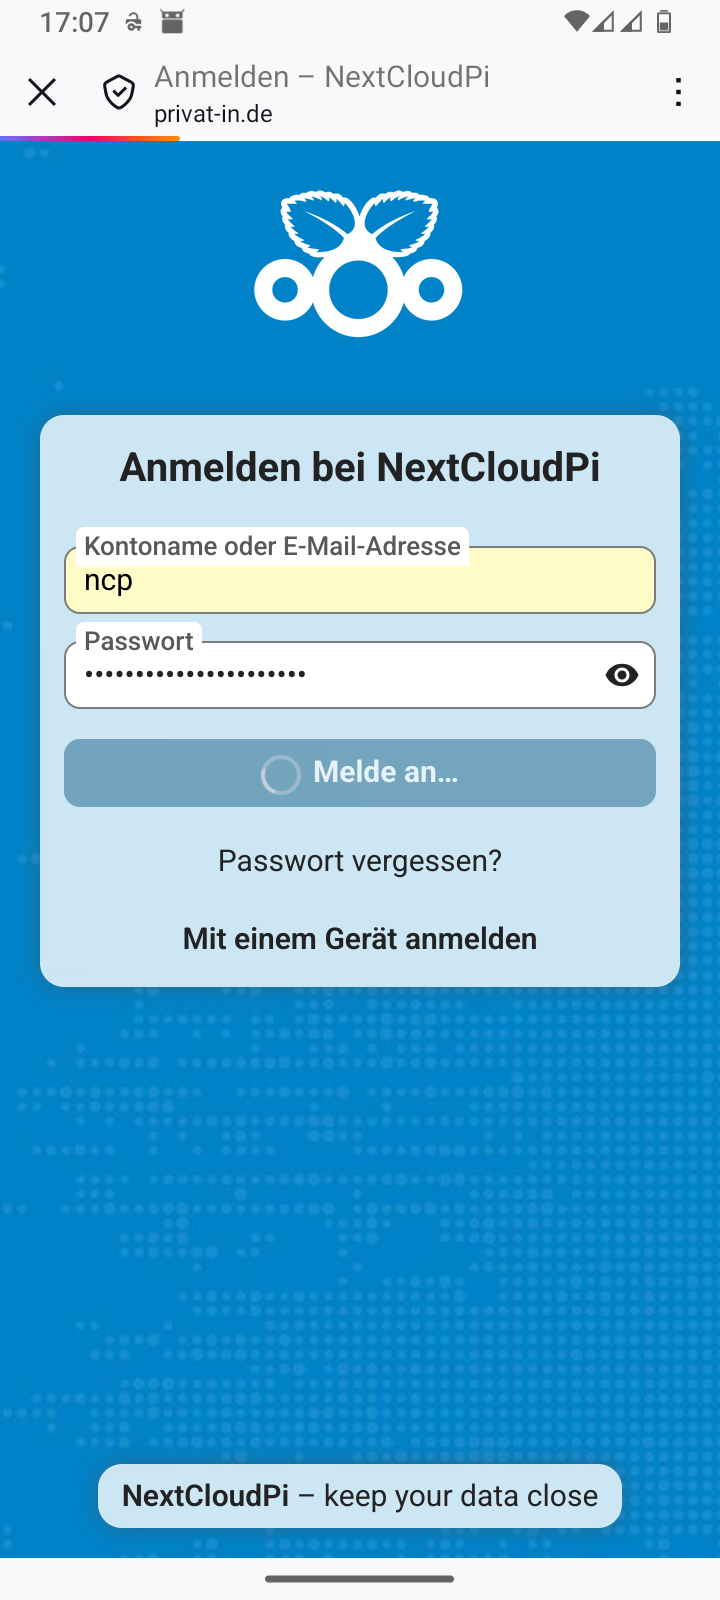
It's done, and your Nextcloud can now be accessed from anywhere in the world. You will be greeted by the login dialog, where you can enter the account name “ncp” and the password you received earlier for your Nextcloud admin account (the shorter password from Installation with Captive Portal). You can conveniently save this password in your web browser.
 |
Your Nextcloud: Login dialog
The next steps depend on your application requirements. You can find reading material on this topic on the Internet, for example the Introduction by Nextcloud GmbH. You should first carry out the following steps:
-
Create a new (normal) user account for yourself. Open the main menu by clicking on the user icon in the top right corner. On the new page, select from the menu on the left. Click on the button to create a new account.
-
In the main menu, switch to the menu item. Warnings and errors are almost always displayed on the Overview page. Some of these may be important. Select the item in the left-hand menu and change the Name entry to the host name you set earlier (see the last step of Installation with Captive Portal).
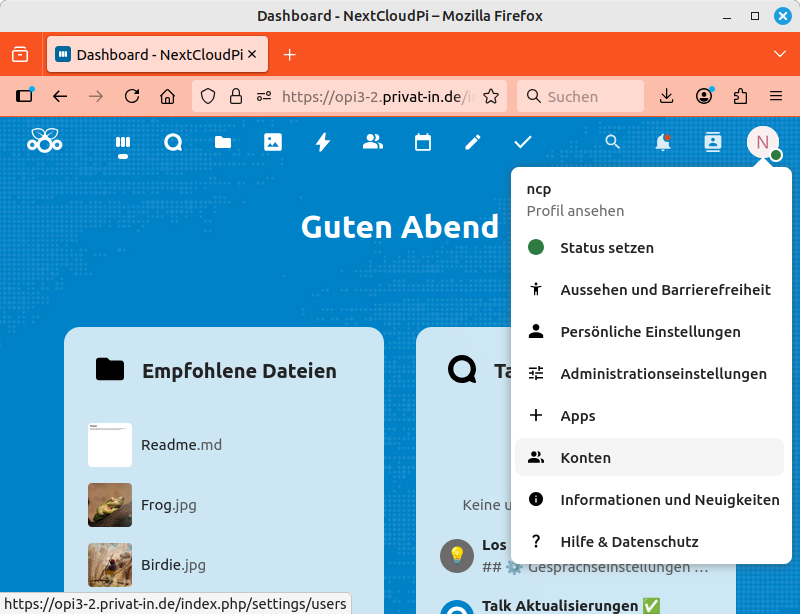 |
Your Nextcloud: Dashboard and main menu
There are various apps available for the Android smartphone operating system that allow you to synchronize files, passwords, addresses, and calendar entries between different devices. You can install these apps using Google Play or F-Droid.
 Nextcloud
App
Nextcloud
App-
This app was developed by Nextcloud GmbH. With this app, you can upload photos, download documents, or synchronize your password manager file. It is possible to synchronize the entire file tree from your Nextcloud to your smartphone. Alternatively, it is also possible to synchronize only individual data on demand, such as your password database file.
 Nextcloud
Talk
Nextcloud
Talk-
This app was also developed by Nextcloud GmbH. With this app, you can participate in conversations that are conducted on your server using Nextcloud Talk. These can be simple text chats, but video calls and conferences are also possible.
 DAVx⁵
DAVx⁵-
The “DAV-X to the power of Five” app was developed by bitfire web engineering GmbH. This app allows you to synchronize addresses, appointments, and tasks. Other apps, such as the system calendar or the phone app, access this data via the Android accounts mechanism. You can purchase this app for a small fee on Google Play. Distribution via F-Droid is donation-based.
Each newly installed app is usually registered indirectly via the Android web browser:
-
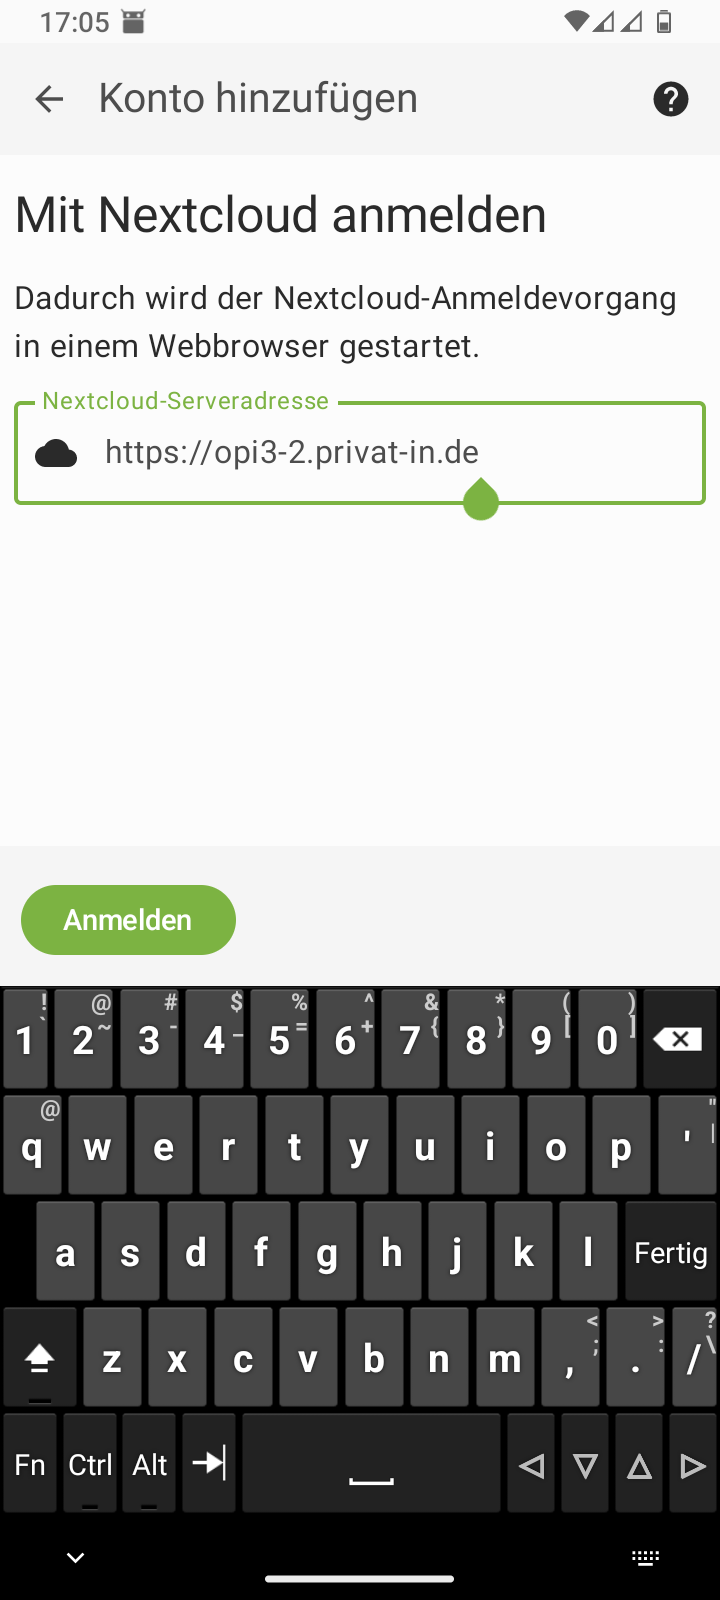
Enter the URL for your Nextcloud in the app.
The app launches the Android web browser with the specified URL.
-
You enter your account name and password.
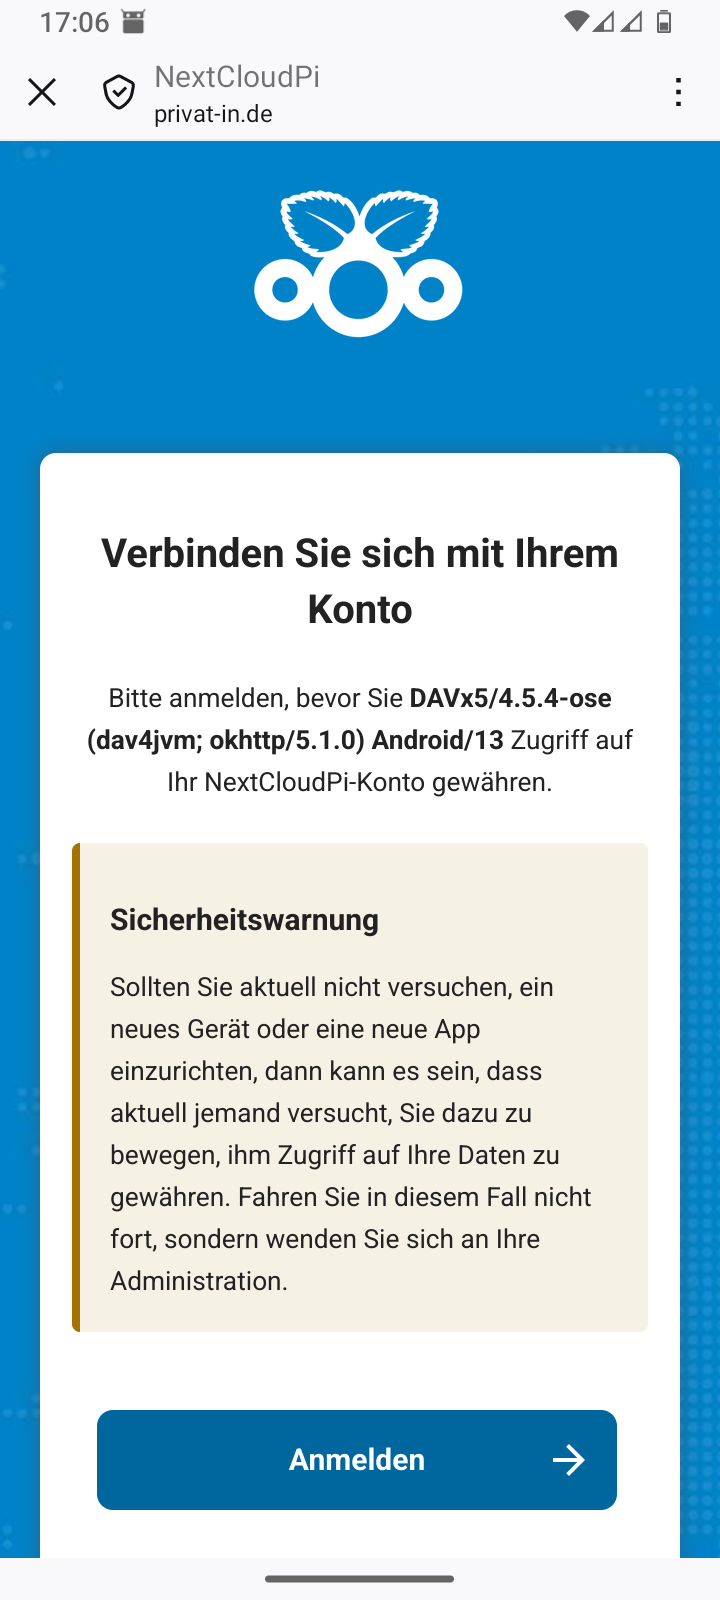
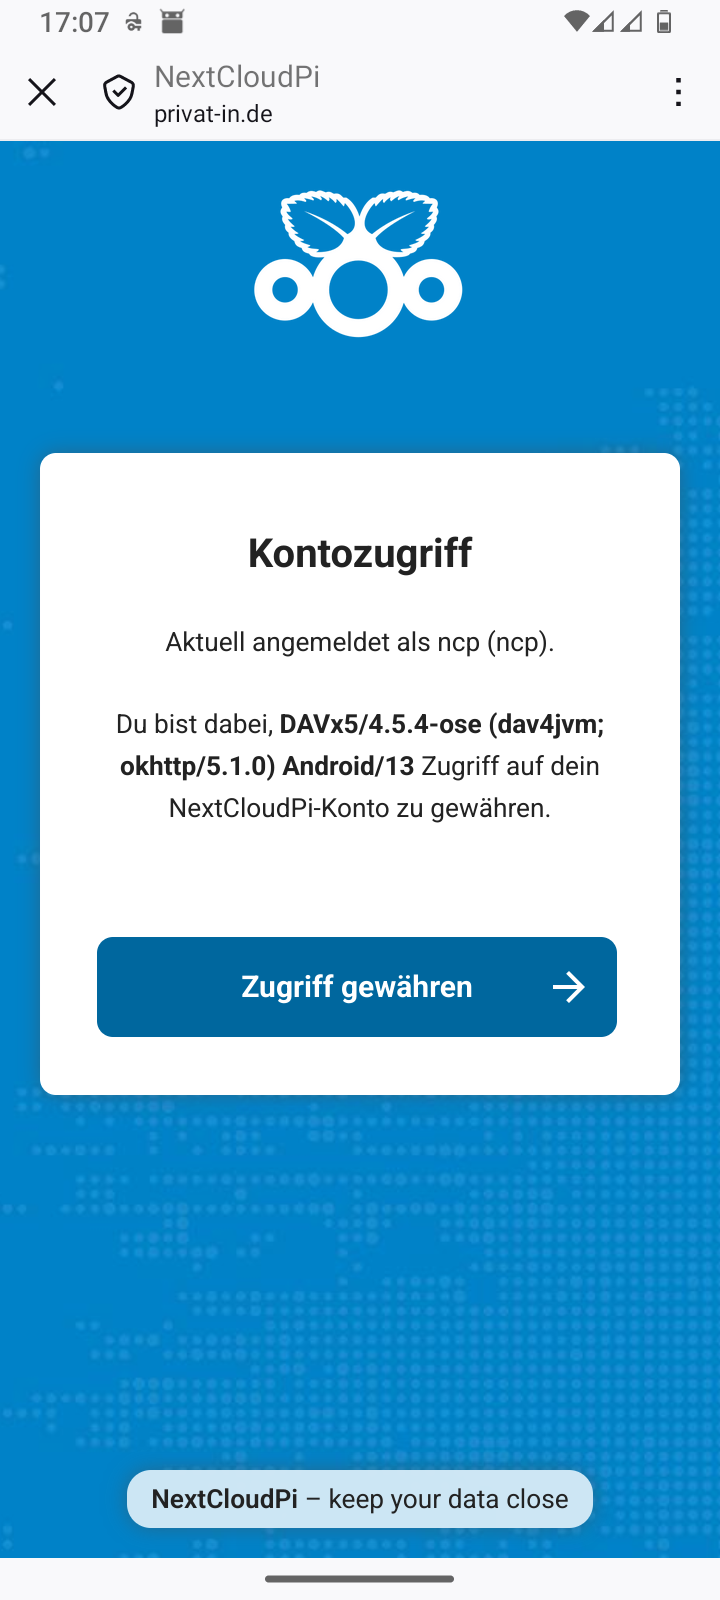
The website displays an access request.
-
You confirm access and close the Android web browser (usually: X icon in the top left corner).
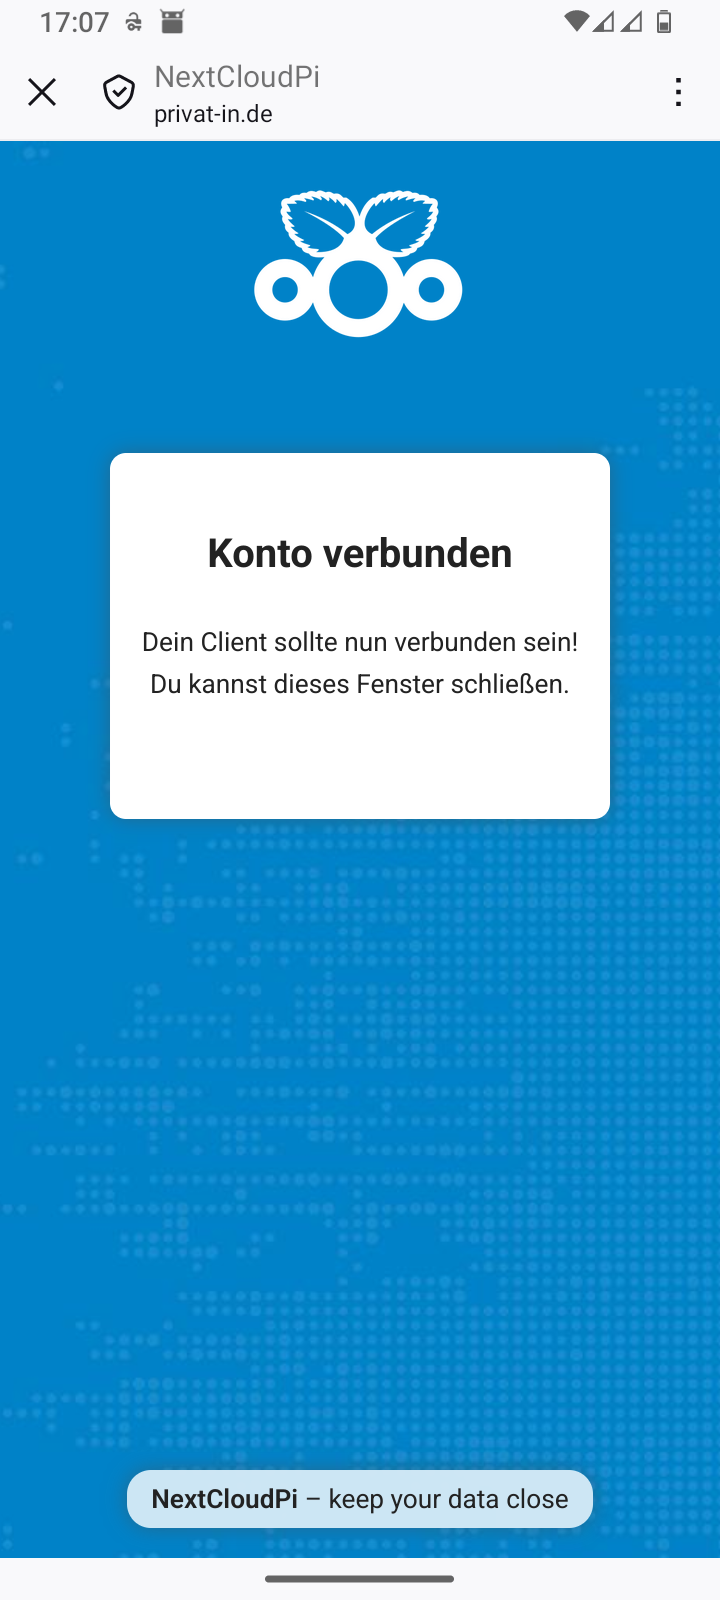
The app takes the authorization response from the web browser. It can then use this to access the data.
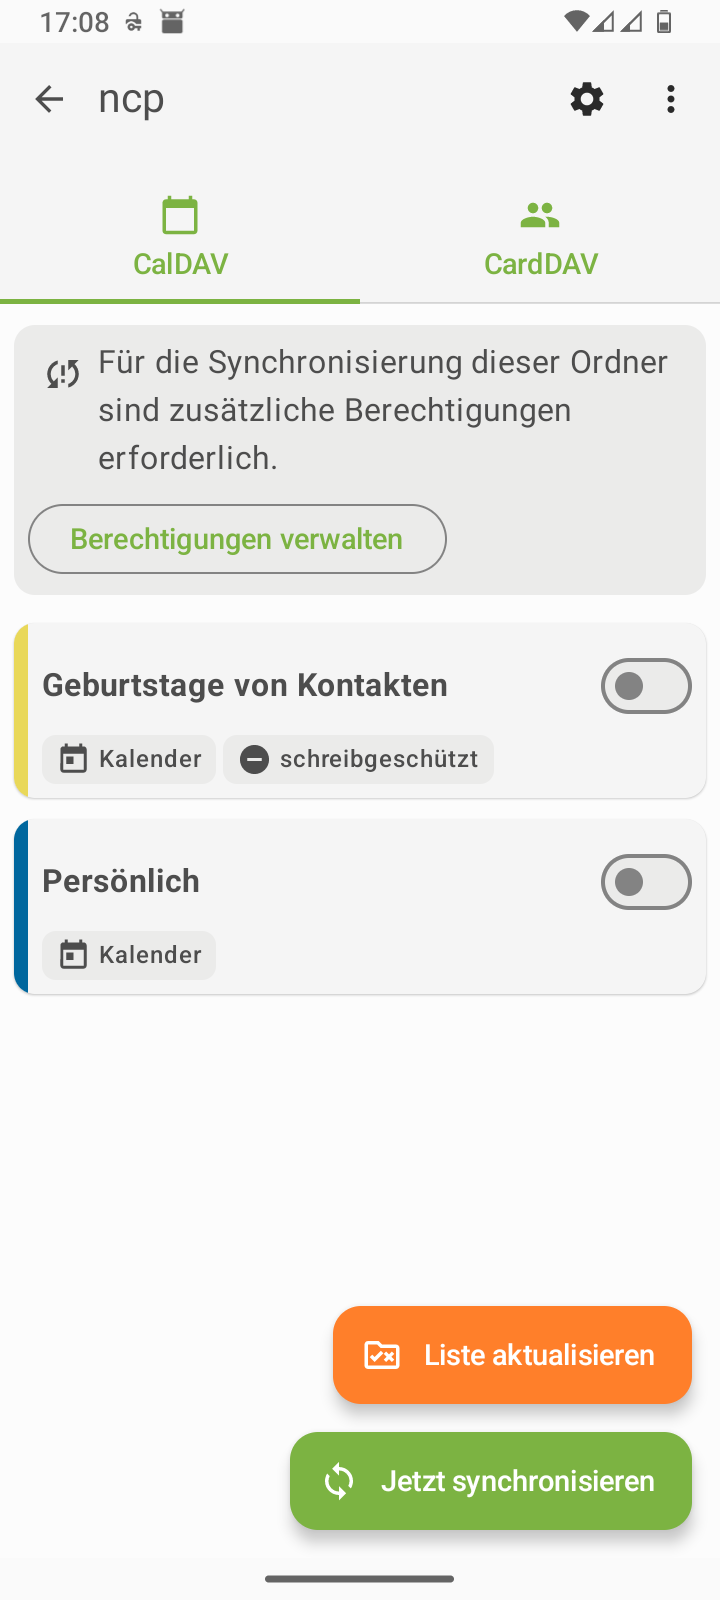
You can manage the access permissions you have granted in the web interface of your Nextcloud. In the main menu, go to the menu item. The Security page displays the access permissions you have granted. You can revoke access permissions here.
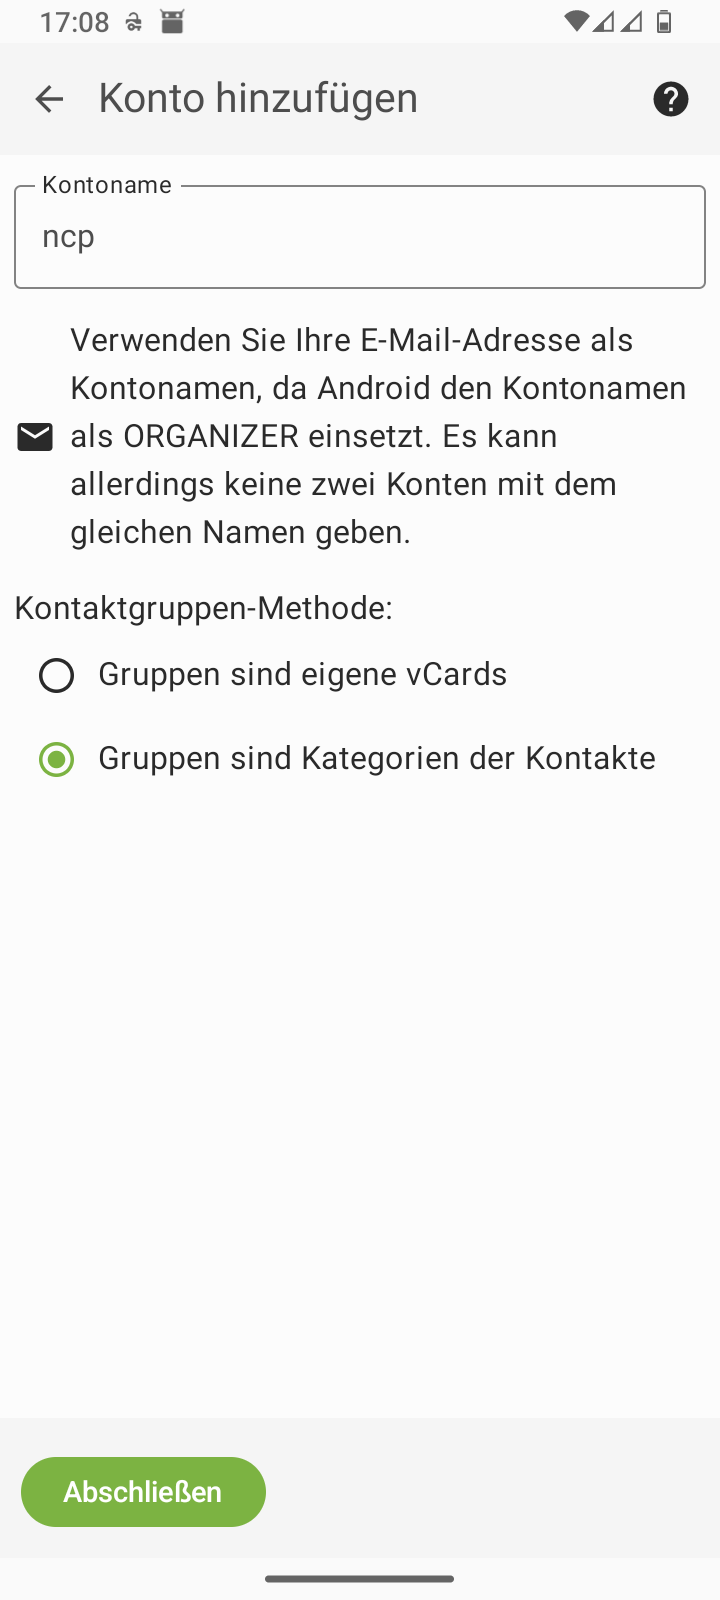
Table 3. Smartphone: Setting up DAVx⁵
Skip DAVx⁵ advertising |
Add an account | ||
Select account type: Nextcloud |
Enter the Nextcloud URL | ||
Confirm registration in your web browser |
Log in to the web browser | ||
Grant access in the web browser |
Close the web browser with | ||
Complete the setup in DAVx⁵ |
Continue with in DAVx⁵ | ||
Start the in DAVx⁵ |
Grant the app permissions |


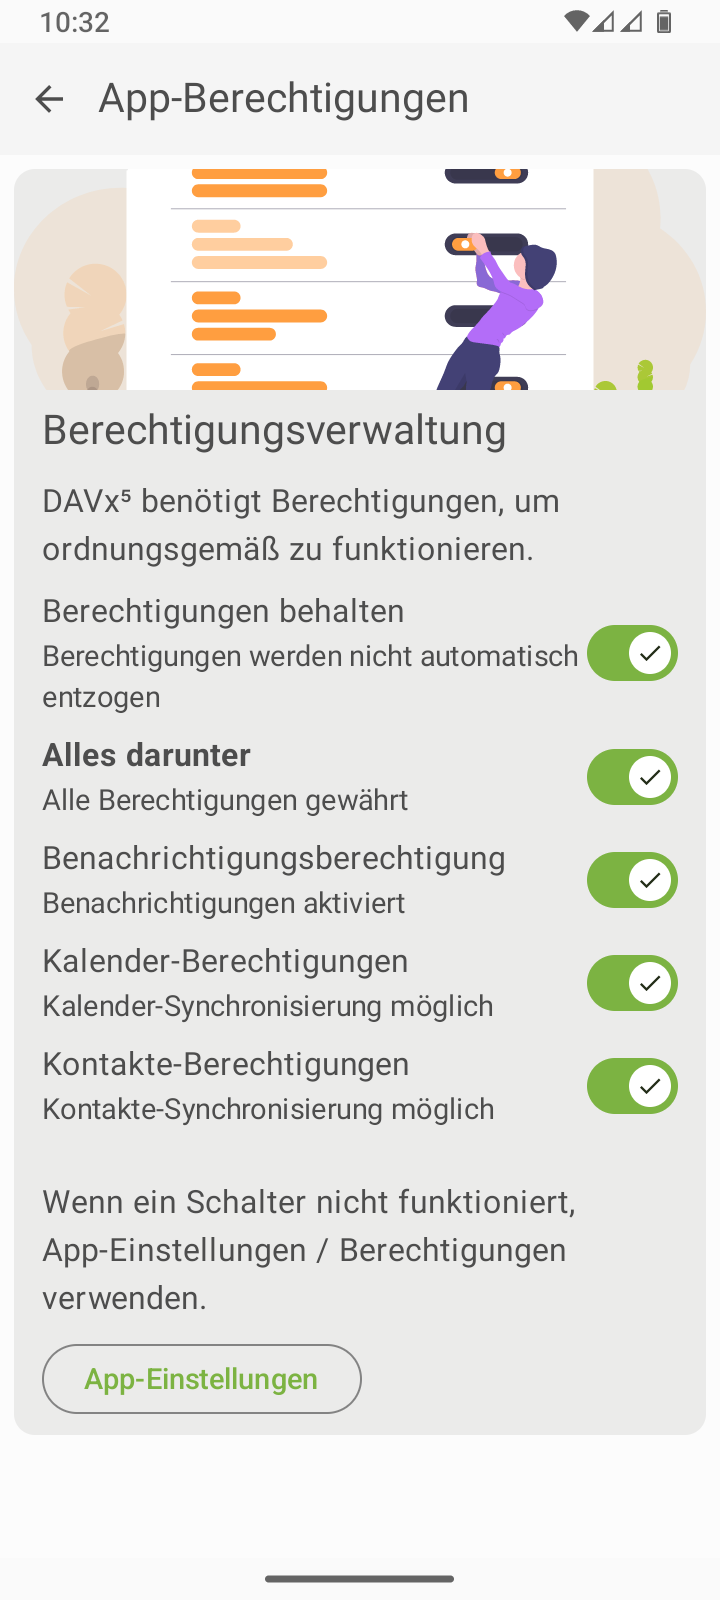
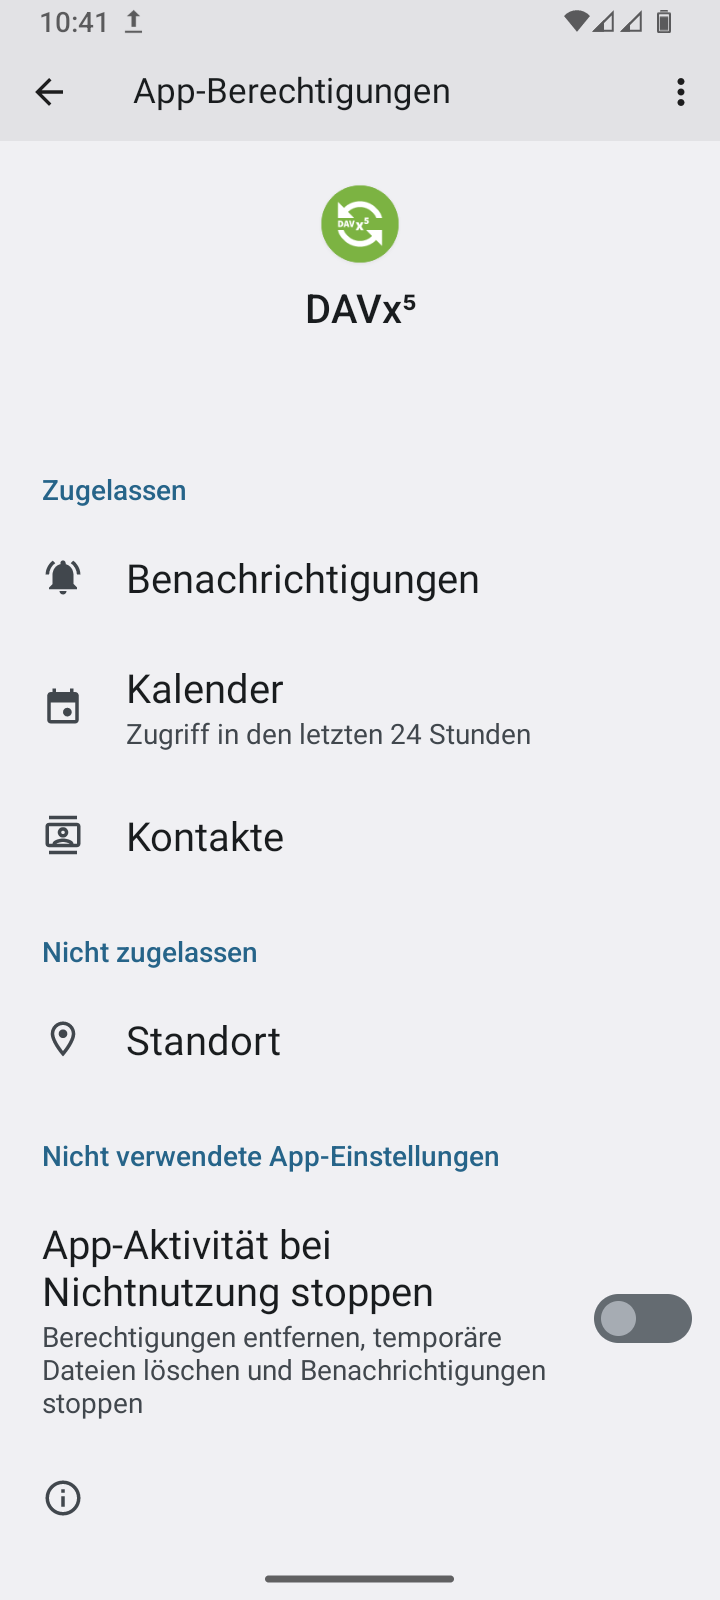
Note
The DAVx⁵ app requires certain permissions to function correctly. You can grant permissions via the permissions dialog in the Android control panel. This can be accessed via the button shown above. Alternatively, you can open the information menu in the Android application launcher by long-pressing the DAVx⁵ icon. There you can select the menu item. You do not need to grant access to your Location, but it is recommended that you disable Stop app activity when not in use.
On a desktop computer, the exact procedure depends heavily on the operating system installed. With a current version of Linux, you can usually install the appropriate software with the “Nextcloud Desktop” package. For MacOS and Windows, you can download a file synchronization program from the Nextcloud GmbH website: Download and install Nextcloud. General explanations on how to configure the file synchronization program can also be found on this website.
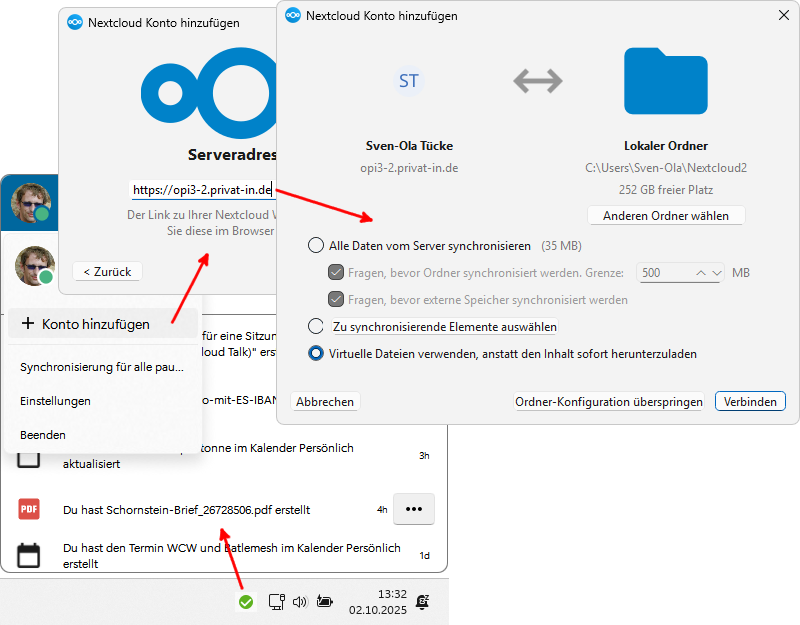 |
Windows: New account with Nextcloud Desktop
When setting up the file synchronization program, all folders and files are synchronized from the server to your user directory on your computer by default. In Windows, replacement with virtual files (“shortcuts”) is also offered.
Tip
Alternatively, you can click the button in the setup wizard and add a single folder later.
There are two different approaches for integrating your Nextcloud contacts and Nextcloud addresses:
-
Some Linux desktops and MacOS manage online accounts via the control panel (examples: Gnome3, KDE, Cinnamon, and Internet Accounts on MacOS). Configured online accounts can then be used by user programs (examples: the Gnome calendar, the Evolution email program).
-
In all other cases, you must configure your Nextcloud calendar via a CalDAV link and your Nextcloud addresses via a CardDAV link individually for the desired programs (examples: Mozilla Thunderbird, Microsoft Outlook).
Note
Central configuration with online accounts is more convenient. However, if there is no control option for access by data-hungry social media programs, it may make more sense to configure your Nextcloud data connections individually for each application.
Using a Cinnamon desktop on Linux as an example, a Nextcloud online account can be set up in this way:
-
 Open System Preferences.
Open the Internet Accounts settings window.
Select the Nextcloud provider.
Open System Preferences.
Open the Internet Accounts settings window.
Select the Nextcloud provider.The Nextcloud Account dialog appears.
-
Configure the URL for your Nextcloud under Server. Enter your Username and Password. Confirm by clicking .
In the selection dialog that follows, you can specify which components of the Internet account are to be used.
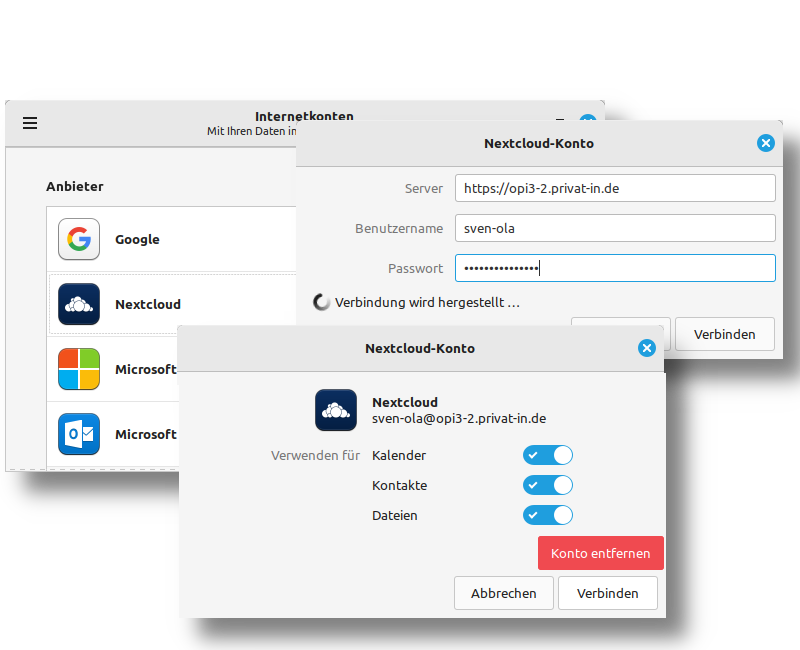 |
Linux - Cinnamon - Control: Setting up a Nextcloud account
Note
The dialog box shown above with the red button does not work correctly in this situation. Your account is already connected, so just click .
Good instructions for various email programs can be found on the Internet, for example, Synchronizing with Thunderbird from Nextcloud GmbH. For Microsoft Outlook on Windows, setup using CardDAV and CalDAV can currently only be done with additional software:
-
Download and install the Outlook CalDav Synchronizer software.
A new menu button should then appear in the Outlook ribbon: .
-
Click on the menu item. This opens the Options window. Click on the green plus icon to create a new profile entry. Then, in a dialog box with lots of colorful company logos, select the plain Generic CalDAV / CardDAV option.
An empty profile will be displayed. Fill in the input fields: Name (of the profile), Username (for your Nextcloud), Password, and Email address. Under Outlook folder, select either “Calendar (This computer only)” or “Addresses (This computer only)”.
-
Additionally, launch a web browser. Log in to your server. Navigate to the Nextcloud Contacts app. Click on the button. Under the Address Books heading on the right, click on the three-dot icon and select the command. Navigate to the Nextcloud Calendar app. Scroll up in the menu area at the bottom left and select the menu command.
-
Paste the copied link into the CalDav Synchronizer profile under DAV URL. Confirm the profile settings with .
You can also configure this setting on other operating systems or with other programs using this method.
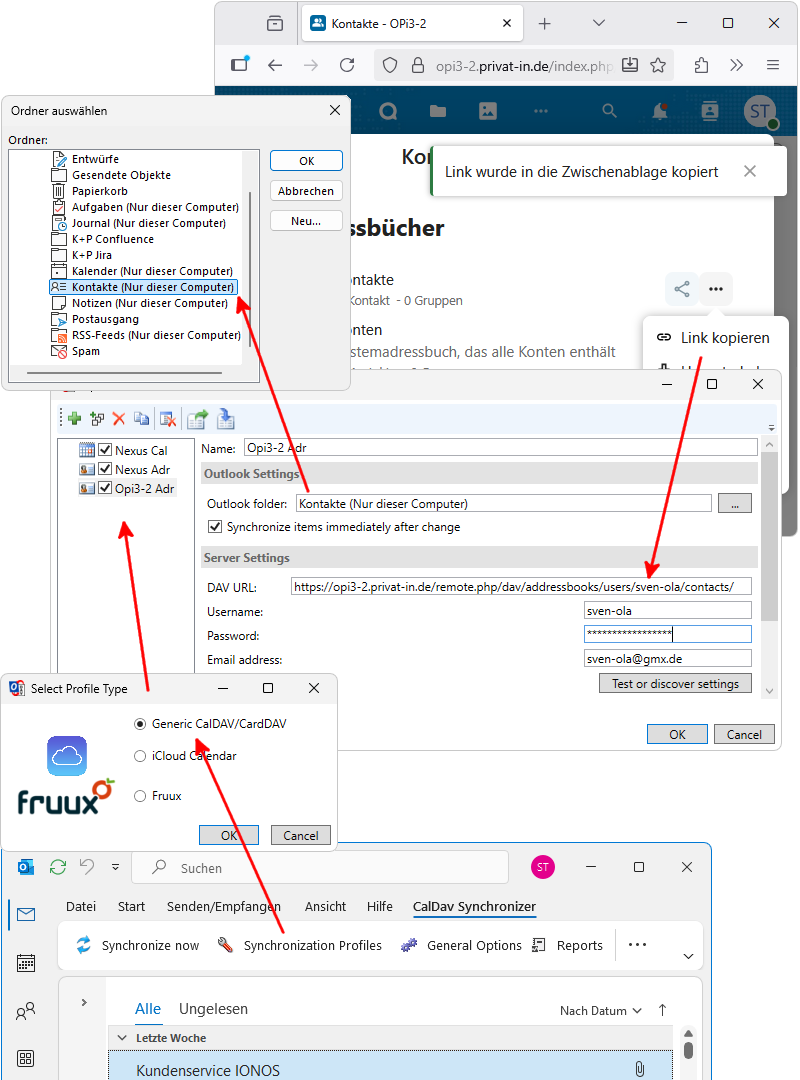 |
Microsoft Outlook: Setting up CalDav Synchronizer
If you don't have a suitable SBC available at the moment, you can also set up Private on the Net in a virtual machine. To do this, you need to install virtual machine software on your desktop computer or notebook. Virtualbox, VMWare, or Linux KVM software should work. The following description shows how to set up a virtual machine using Virtualbox software.
-
Download the virtual hard disk file
x86_64.vmdk(https://privat-in.de/downloads/). -
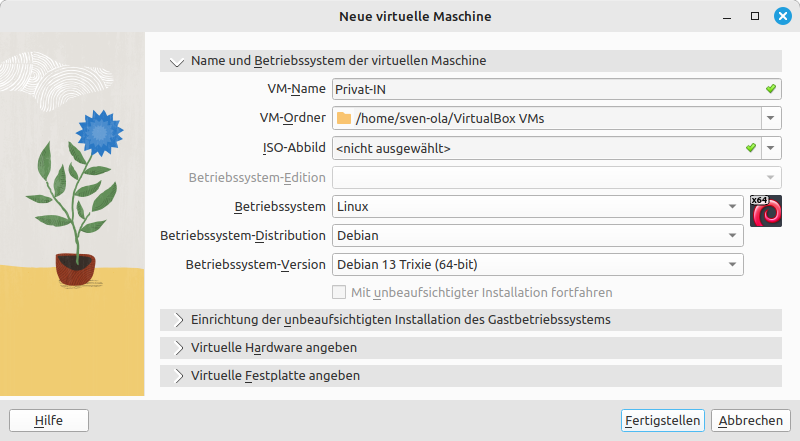
Start the Virtualbox software. Select the command from the menu.
The New Virtual Machine dialog box appears.
-
Enter a suitable name under VM Name, such as “Private IN”. In the Operating System selection, select “Linux”, then the “Debian” operating system distribution and the “Debian 13 Trixie (64-bit)” operating system version. The exact settings are not important, but 64-bit Linux should be selected.
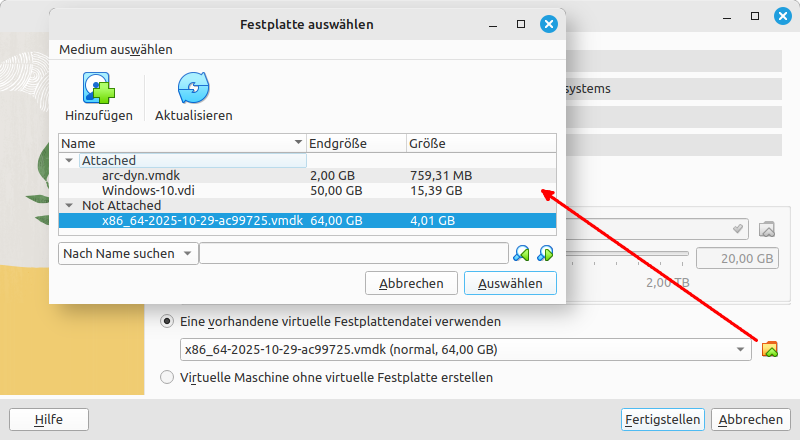
-
In current versions of Virtualbox, you can open a Virtual Hard Disk tab. Select the Use an existing virtual hard disk file option. Click on the browse icon next to the selection and add the previously downloaded
x86_64.vmdkfile in the Select Hard Disk dialog. -
Create the new virtual machine by clicking the button.
-
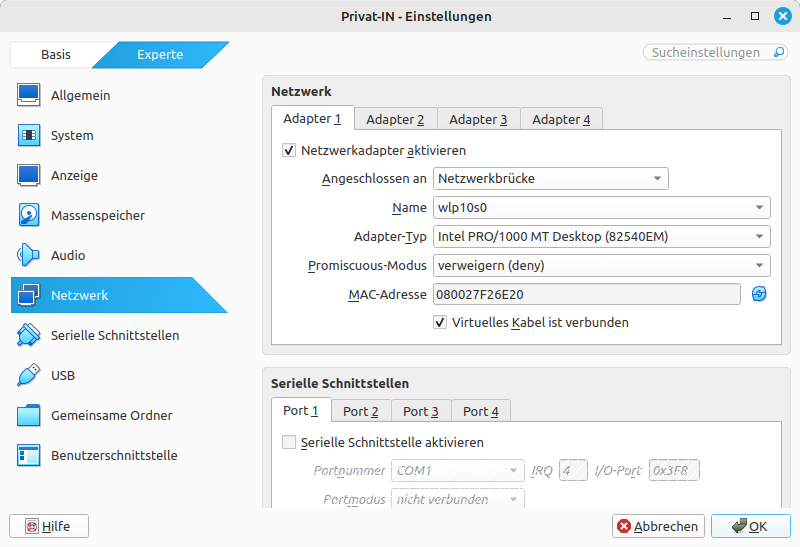
Select the command in the menu. Navigate to the Network tab in the Settings dialog box. Under Adapter 1, change the Connected to setting from “NAT” to “Network Bridge”. Under Name, select the Wi-Fi or Ethernet adapter that connects your computer to the Internet.
The virtual machine is now set up and ready to start. During startup, the current IP address of the virtual machine is displayed before the login prompt. The rest of the installation is carried out using the HTTP web interface at this IP address, as described above.
Tip
The Private on the Net configuration expects a WLAN adapter. This leads to longer waiting times during system startup. This does not prevent the system from functioning in general. If you have the VirtualBox Extension Pack installed, you can optionally set up an additional USB WLAN adapter for the virtual machine. This allows you to use the captive portal on your mobile phone as well.
Table 4. Setting up a virtual machine
Virtualbox: new virtual machine | |
Virtualbox: Select hard disk file | |
Virtualbox: Setting up a network bridge |
A small SBC server can get lost, the SD card can fail, or other accidents can happen. In these cases, a backup is very helpful. That's why you should set up regular and automatic backups for your Nextcloud. You can now set up your own backup using the NextcloudPi panel. However, these instructions describe a collaborative backup concept that allows you to distribute your data across multiple backup providers.
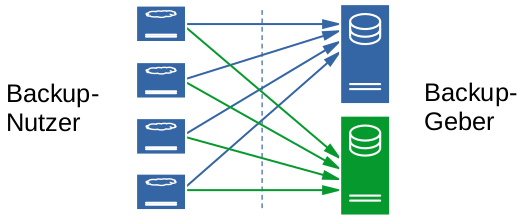 |
Distribute backups across multiple storage locations
Here it is helpful here that
-
SD cards have a size limit for your data collection and
-
the data storage on the SD cards is already encrypted.
However, for your film and photo collection with several terabytes, you should use a different backup concept.
Warning
If you lose your backup password, i.e., the longer password from the last step of Installation with Captive Portal, you will not be able to restore an encrypted backup stored elsewhere using the backup concept presented here!
To maintain your server, it is sufficient to check the log entries in the NextcloudPi panel from time to time. Here you should check whether the backup you have set up is working and whether any unusual messages are displayed. Operating system updates are performed by the Debian autoupdater and are also displayed in the log. Your server may restart from time to time to use the updated Linux kernel.
Tip
For advanced users only - you can set up SSH access in the menu under the menu item.
The prerequisite is that you have the consent of one or more backup providers to store your backups. From here, you can set up one or more backups by following these steps.
-
In the NextcloudPi panel, select from the menu.
-
Copy the setting from Public Key (generated) and send this string to your backup providers. The string is a public SSH key. You can send this string by email, messenger message, or social media post.
The respective backup providers insert the character string into a text file provided for this purpose. They then send you the access address.
-
Now you can enable the Active option. Enter the access address in one of the IP or Address input fields.
-
If you rarely use your Nextcloud, you can set a break of several days using the Sync periodicity (in days) setting. The Hour of Day when syncing setting determines the time of night when the backup is performed. The Blurb files to keep (0=all) setting determines how many message files from the overly verbose NextcloudPi logs that are replaced by nightly backup messages are retained.
-
Confirm your settings with .
 |
Set up nightly backup
If you have set up multiple backup addresses, your backups will be uploaded to a different backup destination each night. You can continue to use your Nextcloud during the nightly backup. The process is initiated with an LVM2 snapshot, which only takes a few moments. The device key is then removed from the snapshot and the entire SD card image is synchronized with the remotely stored version. This process takes longer if a lot of new data has been stored since the last backup. During the upload, the performance of your Nextcloud is slightly limited.
Important
Please make a note of the destination addresses for your backups, for example as a note in your password manager. You will need at least one destination address later as an access address to restore a backup.
Tip
After a few days, you should check whether your backups are being uploaded correctly. To do this, click on the Logs icon in the icon bar of the NextcloudPi panel. The icon is marked by the mouse pointer in the screenshot above. There you should be able to see success or failure messages for each nightly backup.
It's happened: you want to restore an existing backup. To do this, you need the following items:
-
an SBC with the same architecture as the original device. For a device with ARM 32-bit, you need one with ARM 32-bit, and for an ARM 64-bit device, one with ARM 64-bit,
-
an SD card with at least the same or more storage space than the original SD card,
-
the access address of at least one of your backup providers, which can be found in an email or messenger message, for example, and
-
your (long) backup password, which you have stored in a password management program.
First, you must write one of the Private on the Net image files to the SD card. This works as described under Download Image and Write to SD Card. Then, follow the steps that lead to the captive portal page being displayed (see Installation with Captive Portal).
-
Instead of continuing with the button, click the button.
Your web browser will now warn you of a possible security risk. On the Internet and on public websites, you should take this warning seriously and leave the website. Here, however, you must accept the risk. The usual buttons for this are and (or similar).
-
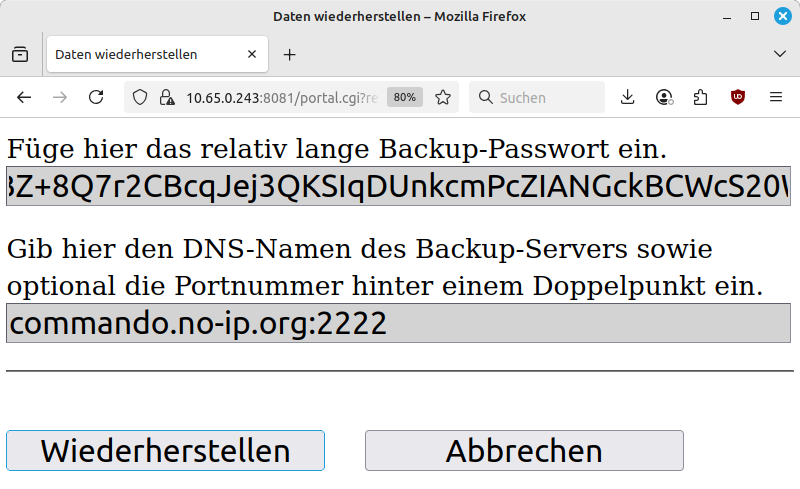
Enter the backup password in the upper input field. Enter the access address in the lower input field. Confirm with .
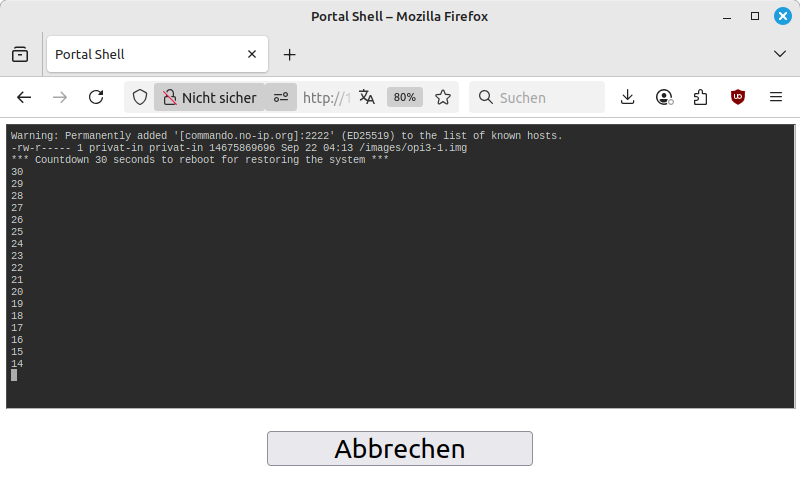
The captive portal page displays the initialization with a terminal output on a black background. First, the date and file size of the existing backup image on the backup provider's server are queried and displayed. Then a 30-second countdown begins, during which the process can still be canceled.
-
Now you have to wait until the backup image has been downloaded and written to the SD card. Note the flashing sequence of the two LEDs on the SBC. The green LED indicates write or read access to the SD card. The red LED flashes once at the start of the restore process. It then shows the approximate progress of the restore: 9 flashes - 90% to go, 8 flashes - 80% to go, etc. The LED flashes in rapid groups of three.
In the event of an error, the red LED will flash continuously. It may help to repeat the process. If that does not work, you can also ask the backup provider to give you the stored image. If you transfer the image directly to a partition on a USB stick or SD card, you can open the encrypted data carrier with a Linux desktop system. After entering your backup password, you will have direct access to your Nextcloud files.
Table 5. Desktop: Restore in browser
Portal page: Recover data | |
Portal page: Image display and countdown | |
Desktop Linux: Direct access to backup image |
From time to time, you should update the Nextcloud software. You can find the latest versions at https://docs.nextcloud.com/. An update takes about 15 minutes. Your Nextcloud will be unavailable during this process.
-
In the NextcloudPi panel, select from the menu.
-
Leave the Version setting at “0” and confirm with .
This will put your Nextcloud into maintenance mode. The next available version of the Nextcloud software will then be downloaded and installed.
-
A green dot next to the Apply button indicates that the update has been successfully completed.
If your browser displays an error message, click on the Logs icon in the icon bar of the NextcloudPi panel to check the status of the update. The icon is marked by the mouse pointer in the following screenshot.
-
After completing the update, check whether you can log in to the Internet address for the web interface of your Nextcloud.
After previous updates, the error message “Access via an untrusted domain” was occasionally displayed when opening the Nextcloud login dialog. To correct this, open the NextcloudPi panel, select from the menu, open the entry again, and confirm with .
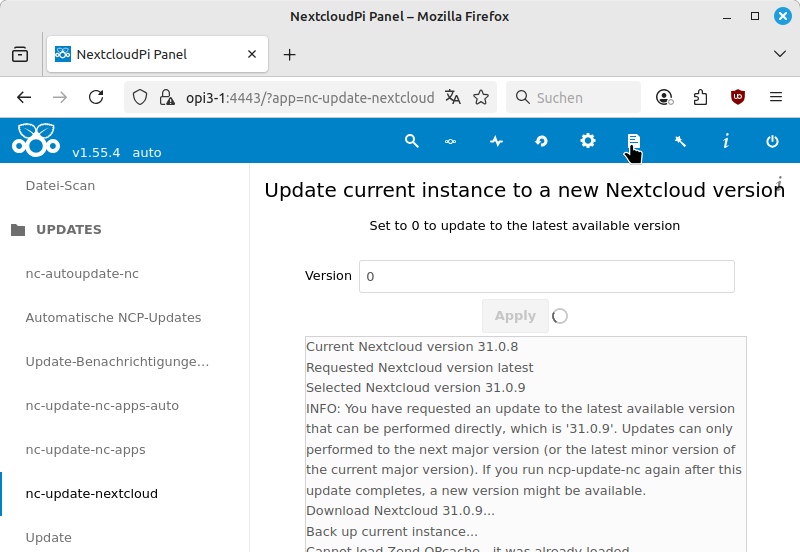 |
Update Nextcloud software
Tip
In the main menu of your Nextcloud web interface, select the menu item. Additional updates may be offered on the Your Apps page.
As a backup provider for other Private on the Net SBC operators, you can offer backup storage space. To do this, you need fast Internet access, the ability to forward ports on your Internet access device, and an unused USB hard drive.
 |
Banana Pi M2U with SATA hard drive as backup server
Follow these steps to set up your SBC for storing backups:
-
Connect the USB hard drive to your SBC. Note that the power consumption for the USB hard drive should not exceed 500mA. Some USB hard drives require an additional power supply to function reliably.
-
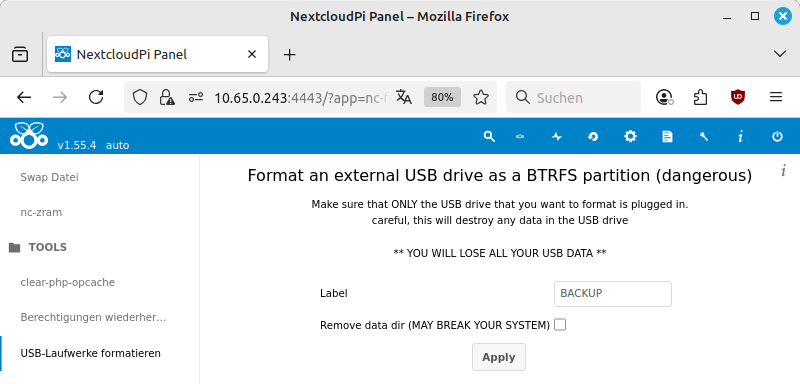
In the NextcloudPi panel, select from the menu. Enter a name for the USB hard drive in the Label input field. Use a name similar to that used for file names and without spaces. The Remove data dir option is only relevant if the USB hard drive was used to store your Nextcloud data. Confirm with .
The USB hard drive will be completely reformatted.
-
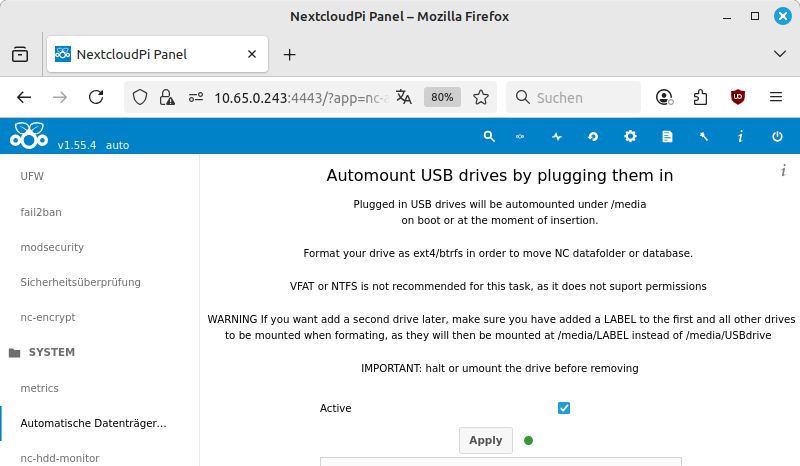
In the menu, select the entry. Activate the Active option. Confirm with .
The USB hard drive will now be mounted under
/media/${Label}and will remain mounted after the next restart. -
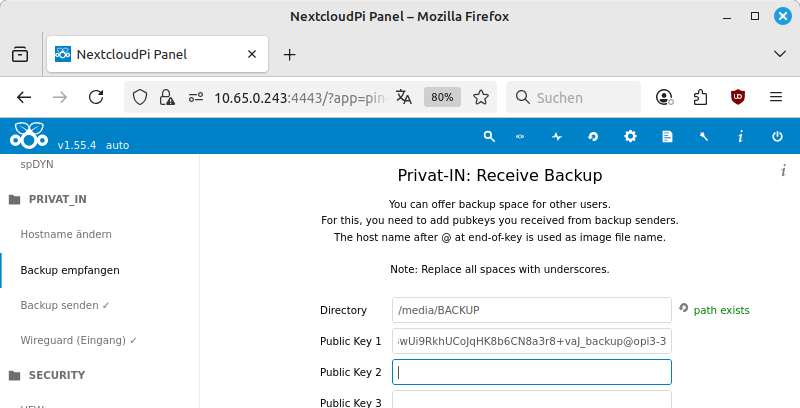
In the menu, select the entry. Change the Directory setting to the directory path of the connected USB hard drive:
/media/${Label}. The website changes the display next to the input field to the green text “path exists”. Enter one or more of the public SSH keys received from other users in the Public Key input fields. Confirm with .A new user named “privat-in” is now created on the SBC. The configured public keys are entered in the file
/home/privat-in/.ssh/authorized_keys.
Note
The input fields of the NextcloudPi panel do not process spaces correctly. Therefore, you must replace spaces with underscores in public keys.
Backups can now be stored on your SBC. Please note that backup
users can only call up exactly one script via the
authorized_keys file:
/usr/bin/privat-in-receive-backup. Please also note
that the script /etc/rc.local sets a spindown after
30 seconds without access for the USB hard drive.
The bandwidth load for your Internet access can be high when many newly created backup users upload their first backup. During normal operation, this is significantly less. However, you should expect at least 64 Mb of downloads and 2 Mb of uploads per day and backup user, plus the additional files saved by the backup users since the last backup.
The reception script assigns a “time penalty” for each new action. This is intended to slow down actions that are particularly memory- or computation-intensive. However, the only way to combat particularly “creative” minds may be to delete the SSH key used from the list.
Table 6. Set up USB hard drive for backup
NextcloudPi Panel: Format USB hard drive | |
NextcloudPi Panel: Connecting a USB hard drive | |
NextcloudPi Panel: Receive backup |
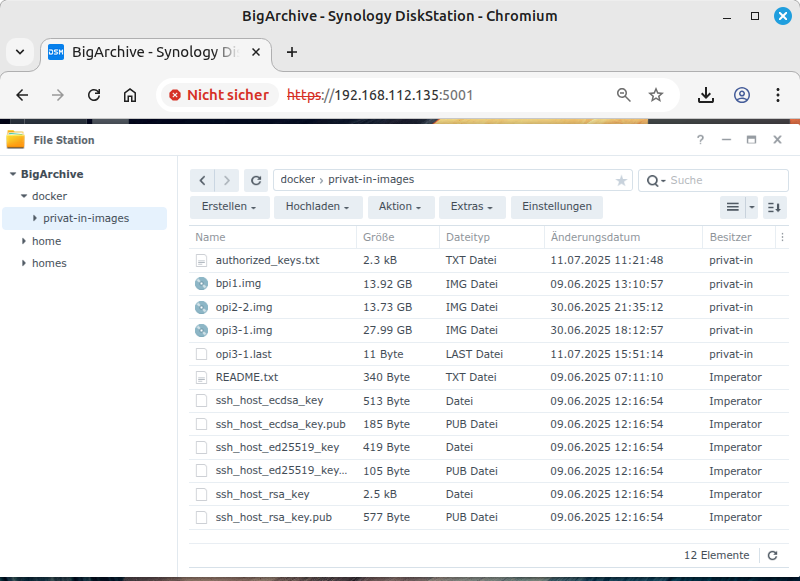
If you operate a Synology DiskStation, you can use it to offer backup storage as a backup provider for other operators of a Private on the Net SBC. To do this, you need to import a Docker image onto your DiskStation and use it to set up separate storage access for other participants.
-
Download the archive file https://privat-in.de/downloads/privat-in-backup-amd64.tar, which is approximately 13 megabytes in size.
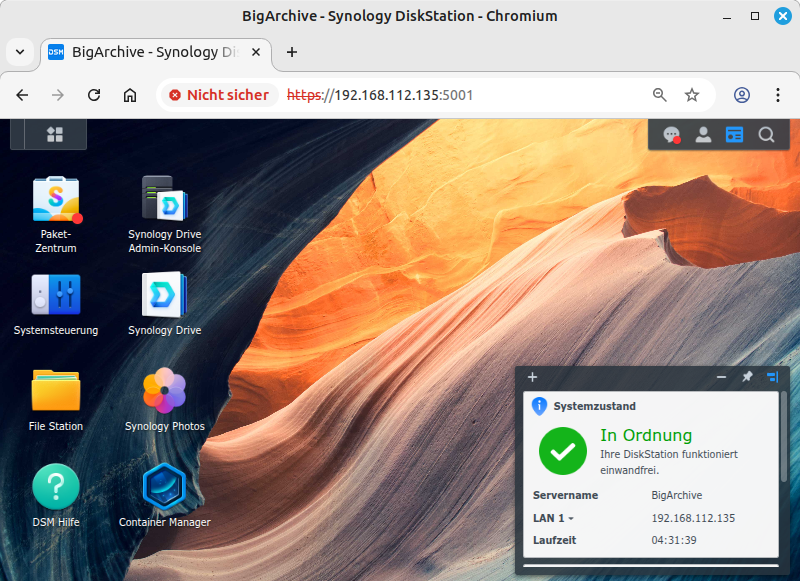
Then log in to your DiskStation.
-
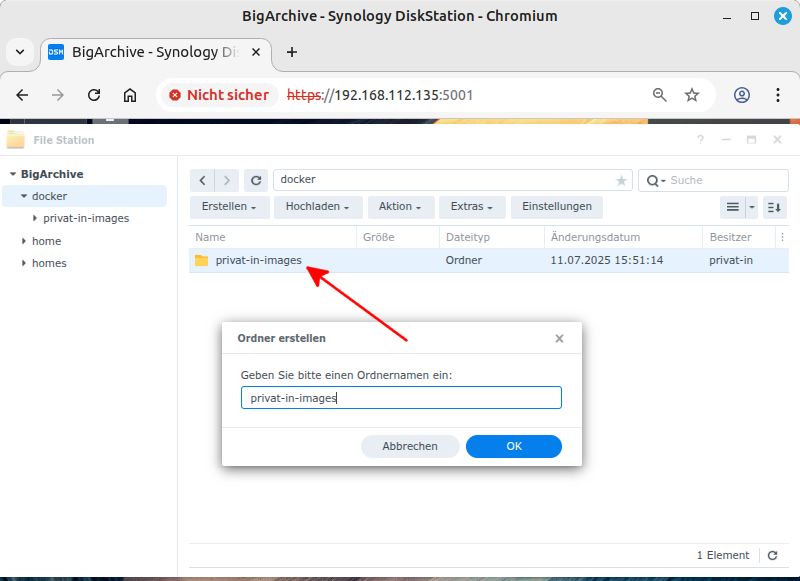
Start the FileStation program. Navigate to the
/dockerdirectory in the directory tree. Click on the menu button. Select the menu item. Enter a folder name, for example,privat-in-images. Confirm with . -
Start the Container Manager program. Use the window menu to navigate to the menu item. If no Docker images have been imported yet, click the menu button displayed in the center. Otherwise, click the menu button and open the submenu.
From the submenu, select the menu item. In the file selection window, locate the archive file you just downloaded,
privat-in-backup-amd64.tar, and confirm your selection. -
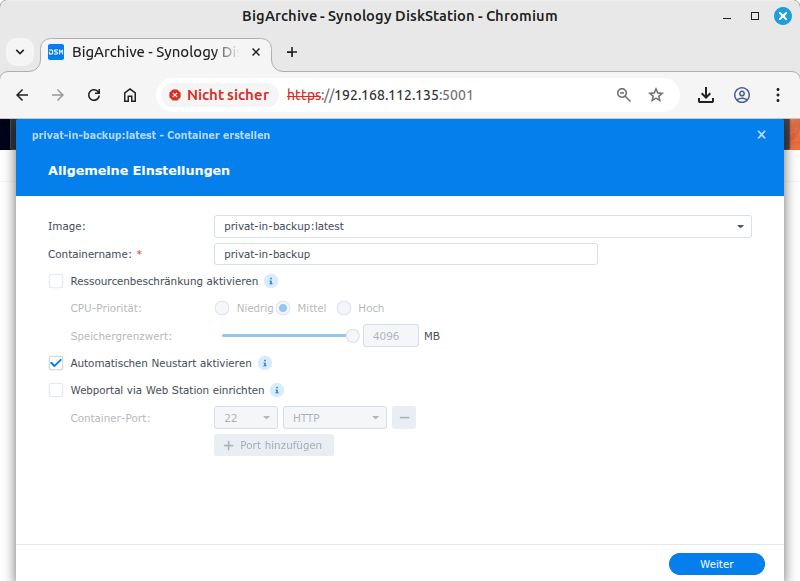
Use the Container Manager program's window menu to navigate to the menu item. Click on the button. This opens the General Settings dialog box. From the Image drop-down menu, select the image you just imported, “privat-in-backup:latest”. Enable the Enable automatic restart option. Leave the other settings at their default values. Confirm by clicking .
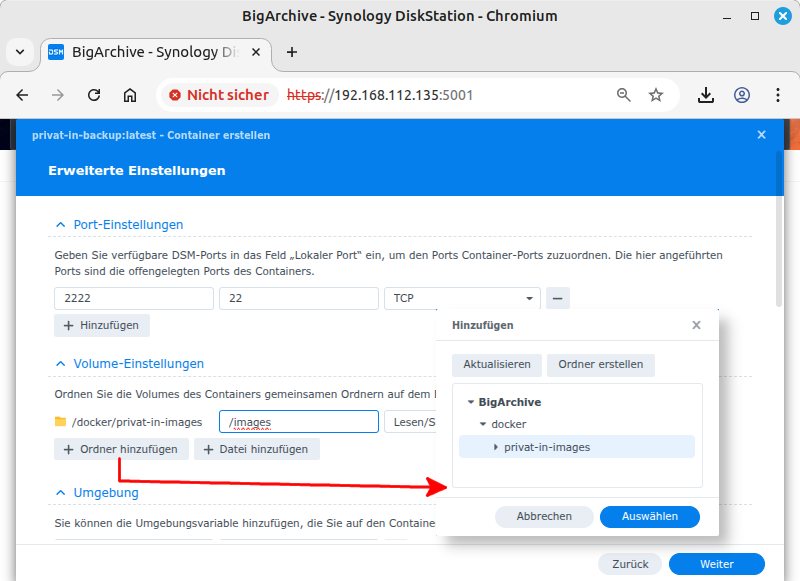
This opens the Advanced Settings dialog. Under the heading Port Settings, change the setting for Local Port to “2222”, for example, and leave the input fields to the right of it set to “22” and “TCP”. This configures a forwarding for the IP address of your DiskStation on port 2222 to the internal IP address of the Docker container on port 22. Under the heading Volume Settings, click the button. In the selection dialog, select the previously created directory
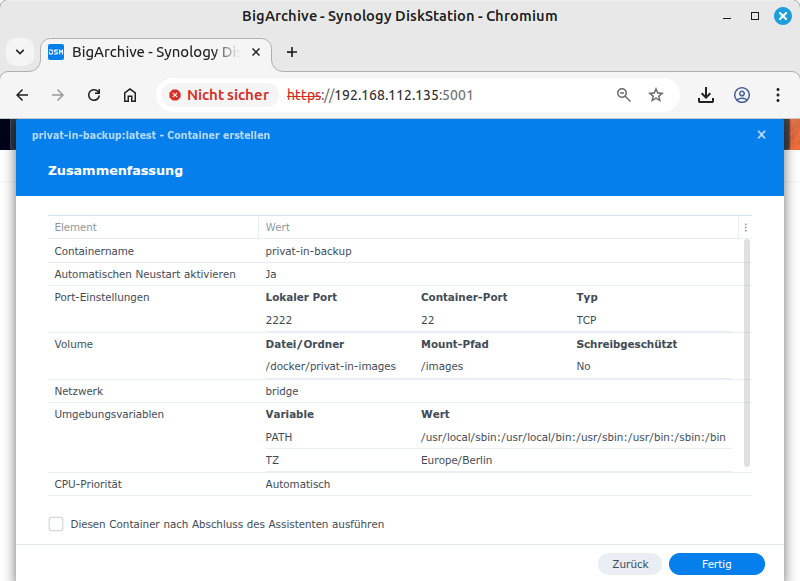
/docker/privat-in-images. Confirm with . Next to the newly displayed folder entry, enter exactly the character string/images. This is a slash character followed by exactly 6 letters. Leave the access set to “Read/Write”. Confirm with .This opens the Summary dialog box. Confirm with .
-
Set up port forwarding for port 2222 to your DiskStation on your Internet connection device.
Note
The name and location of the data folder for the container can be chosen freely. However, the mount point “/images” specified during setup is expected to remain unchanged. The same applies to the externally visible port: you can use a port number other than 2222, but the container will only listen on port 22 for the SSH service.
Operating instructions
During the initial start of the “privat-in-backup” container, new files are written to the assigned data folder. These are initially files with generated host keys for SSH. These make the running container identifiable for the SBC of the backup users. Before uploading a backup, a check is performed each time to ensure that these host keys are unchanged. Existing host keys are not overwritten when the container is restarted or updated.
In addition, a new file called
authorized_keys.txt is created. This file initially
contains the public keys of the Private on the
Net development devices. You can add new public keys to
this file or delete unwanted public keys. The contents of this file are
transferred to the container when it is restarted. Underscores are
replaced by spaces and line end characters inserted by different
operating systems or text editors are corrected.
To update, first stop the running container. Then delete both the Private on the Net container and the associated image. The data directory must be retained. Then repeat the installation as described above.
Note
The uploaded image files are so-called sparse files. They take up less space than shown because unwritten file areas are present as “memory holes”. This is a feature of the storage file system (Ext4 or Btrfs). If you copy these files to another file system (e.g., NTFS, VFAT, or exFAT), memory holes are converted to areas with zero bytes.
Table 7. Set up Synology NAS for backup
Disk Station: Log in as administrator | |
File Station: Create a folder | |
Container Manager / Image: Import image | |
Container Manager / Container: Create container (General settings) | |
Container Manager / Container: Create container (Advanced settings) | |
Container Manager / Container: Create Container (Summary) | |
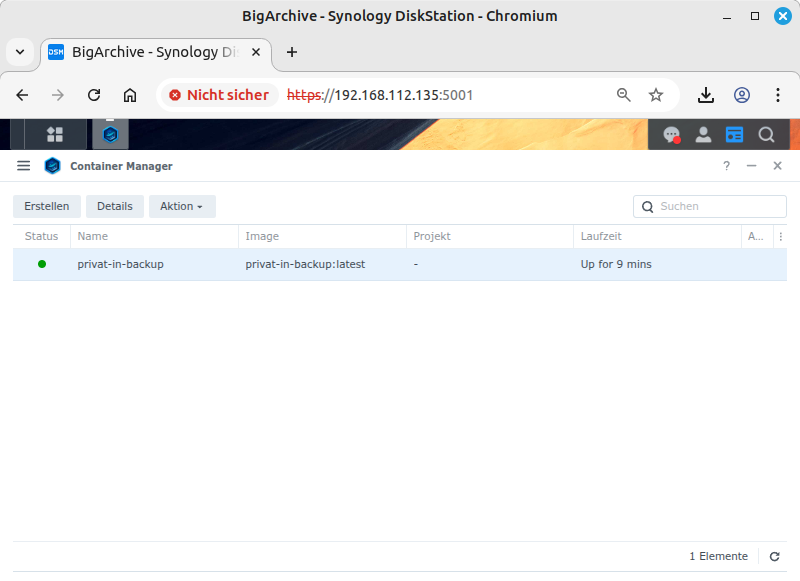
Container Manager: Container is running | |
File Station; Manage backup folders |

If you are running a Debian system with an X86 CPU with 64-bit architecture, you can also offer backup storage space as a backup provider for other Private on the Net SBC operators. To do this, add a new package source to your Debian system, install a suitable software package, and create a new user. In addition, your Debian system should be accessible externally via SSH.
-
Add the software repository for Private on the Net as an additional software source. To do this, execute the following commands in a terminal:
wget -q -O - https://privat-in.de/privat-in.asc | \
  sudo tee /etc/apt/trusted.gpg.d/privat-in.asc
echo "deb https://privat-in.de/repo trixie main" | \
  sudo tee /etc/apt/sources.list.d/privat-in.list
-
Install the software package for receiving backups:
sudo apt-get update && sudo apt-get install privat-in-backup
The newly installed package requests additional packages, specifically a customized version of Blocksync-Fast.
-
Create a new user, for example, “private-in”. This user should not be listed in the login dialog. Therefore, you create a system user:
sudo useradd --system --create-home --shell /bin/false privat-in
The home directory
/home/privat-instores the backups and the list of authorized SSH keys. -
Create a list of approved SSH keys for the backup user.:
sudo mkdir /home/privat-in/.ssh
echo 'command="/usr/bin/privat-in-receive-backup demo" ssh-ed25519' \
  AAAAC3NzaC1lZDI1NTE5AAAAIJaxiKzeEvCTSGikvvb/LFOw5WjmFeHkPM+avbIq1aib \
  root@demo | sudo tee /home/privat-in/.ssh/authorized_keys
I have deleted the private part of the demo key above. For further entries, you can simply copy the existing line. Then enter a suitable unique name instead of “demo” and the public key that was sent to you. The name determines the file name of the locally stored backup image file.
-
Zum Abschluss musst du ein Speicherverzeichnis einrichten und das Verzeichnis für das Skript
privat-in-receivekonfigurieren:Finally, you need to set up a storage directory and configure the directory for the
privat-in-receivescript:echo "IMG_DIR=/home/privat-in/images" | \ sudo tee /etc/default/privat-in-receive-backup sudo mkdir /home/privat-in/images sudo chown --recursive privat-in:privat-in /home/privat-in
Now you can upload an initial backup from an existing Private on the Net installation.
Operating instructions
The updates available from time to time, in particular for the
privat-in-receive-backup script, are available as
usual via the Debian update system.
The uploaded image files are so-called sparse files. They take up less space than indicated because there are unwritten file areas that serve as “storage holes”. This is a feature of the storage file system (Ext4 or Btrfs). If you want to change the storage location for the image files, you must use a file system with sparse support.
A. Storage Concept
One of the real disadvantages of self-operated IT infrastructure is the possibility of data loss. There is a tried and tested remedy for data loss: a backup. It should be stored as decentralized as possible, performed as automatically as possible, encrypted as well as possible, without disrupting ongoing operations if possible, and ideally with more than one recovery option.
The Private on the Net project uses this storage and backup concept to address the above design goals:
-
Each SD card initially contains a bootable Armbian image, which also can be downloaded from https://www.armbian.com/download/. Creating bootable images for very different SBCs is an art in itself. That is why the layout of the SD card is adopted as it is and only supplemented by a few additionally installed packages and configuration files. In addition, all packages that will later be installed by the NextcloudPi installation script are pre-installed.
This area of the SD card is the same for all users. It therefore does not need to be encrypted or backed up.
-
During the first startup, a script is launched in the initramfs. The script creates a new partition in the unallocated larger part of the SD card. This partition is managed with LVM2, or more precisely: the new partition is used as a “physical volume”, in which a new “volume group” is set up, which in turn provides a large part of the storage space for a new “logical volume”.
The new logical volume is then initialized for LUKS data encryption. This step must be performed individually on all devices, otherwise the master key would be the same for all devices (see Cryptsetup FAQ). An empty Ext4 file system is created in the encrypted data area. The existing Armbian partition is then overlaid with the encrypted Ext4 file system (“UnionFS”). The overlaid UnionFS is set up as the root file system so that the normal Linux startup process can now run.
Until now nothing special, but this is used in a very similar way in Docker, Podman, and some Linux distributions as well. What is perhaps special is that two LUKS keyslots are used here: one keyslot with the default “admin” password, and the second keyslot is a random byte sequence stored in an extra memory chip (“NOR flash”) on the SBC. The default password is overwritten with a user password after installation. The byte sequence in the NOR flash unlocks the encrypted LUKS storage area when the system is restarted. As a side note: in principle, this would probably be the area of application for a TPM. Unfortunately, there are no inexpensive SBCs with built-in TPM, and a plug-in TPM would not be any more secure, but I am happy to be corrected on this point.
-
When a backup is to be uploaded, an LVM2 snapshot is first created. The start key keyslot is removed from the snapshot. This process takes less than a second. This produces a second view of the overlaying LUKS file system, which can then be uploaded as an image backup. Parallel write operations to the root file system are outsourced to a temporary storage area (“snapshot COW volume”). This allows the root file system to continue to be used during the backup process.
-
Uploading an image backup with several gigabytes takes quite a long time. To optimize this process, a suitable synchronization program is used: Blocksync-fast. Blocksync-fast works with a checksum file (“digest”). A sequence of checksums can be used to check section by section whether a specific part of an image needs to be uploaded again. The checksums are calculated using a fast algorithm that creates a 4-byte checksum for every 2 megabytes. The checksum file is stored on the sender's computer.
-
To recalculate the checksums, the snapshot storage would have to be read completely for each backup. To optimize this process, a little-known extension of the Linux kernel is used: DM-Era. DM-Era stores which blocks of a storage device are being written to in an additional metadata partition. The list of blocks written since the last backup can be queried as an XML file. This list can then be used to further optimize the copying process of Blocksync-fast.
Encrypted image files are stored as backups on the backup provider's storage device. These image files can only be read using the user password. To restore a backup, a user needs the LUKS password, IP address, and port number of the backup provider, and the private SSH key used to upload the backup. For this reason, the LUKS password contains a converted form of the private SSH key. The LUKS password is therefore almost 100 characters long.
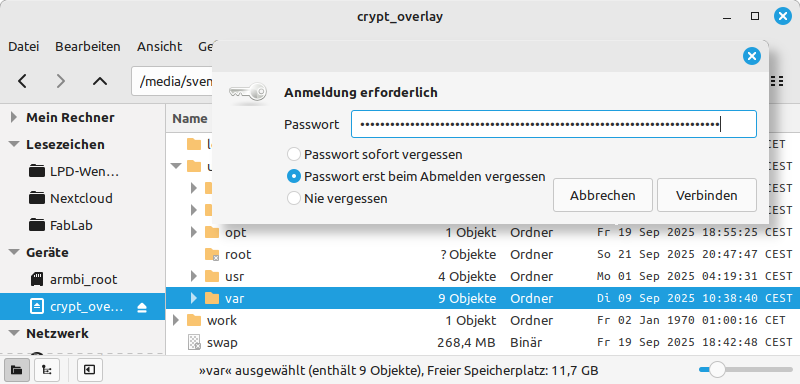
Tip
If a user is unable to restore their backup themselves, you can also use a saved backup image file without the restore function. To do this, copy the image file directly to a sufficiently large partition on a data carrier (USB stick or SD card). Connect the data carrier to a Linux PC and enter the LUKS password in the prompt dialog.
Note
You can also insert the SBC's SD card into a Linux PC. You can access the encrypted part after entering the LUKS password. However, this access will result in a full backup without DM-ERA differences during the next backup. In addition, you can only access one Private on the Net SD card at a time in this way, as the naming of the volume group and logical volume is the same for all SBCs (“vg0-lv0”).
In addition, automatic unmounting of the LVM-LUKS partition does not always work completely on current Linux systems, meaning that an SD card inserted afterwards cannot be decrypted. In this case, restarting the Linux system or, alternatively, entering the commands sudo dmsetup remove /dev/mapper/luks-*, sudo vgchange -an vg0, and sudo cryptsetup luksClose vg0-lv0 will help.
Colophon
This manual was written as a DocBook XML file using XMLMind XML Editor and converted to HTML using the Linux package xmlto. See https://www.xmlmind.com/xmleditor/ and https://docbook.org/. I translated the English version with the help of Deepl.com.